Share
Pin
Tweet
Send
Share
Send
Content
1. Characteristics of the bar stool.
2. Tools and materials.
3. The sequence of manufacture.
Bar stools are a convenient attribute for tables with a height of more than 850 mm. Outwardly, they can be similar to ordinary stools, but only with elongated legs. The height of the chair should be 300 - 350 mm lower than the level of the countertop.
The remaining parameters (width, length, height of the stitches, the presence of a back) are adapted to the wishes of the user and the design of the room. Consider how you can make a bar stool with your own hands from a bar, which, for example, can be purchased in hardware stores.
Tools and materials.
To manufacture the presented model, you will need the following set of tools:
- - square;
- - roulette;
- - a simple pencil;
- - drill;
- - drills with a diameter of 2.5 mm, 3.5 mm;
- - manual milling machine with nozzles;
- - hammer;
- - a screwdriver with a cross profile;
- - sanding paper with different grit;
- - vibration grinding machine;
- - core;
- - soft brush for painting;
- - stationery knife.
The following materials are required, the part number is indicated in parentheses:
1. Wooden beam for legs, section 30 by 40 mm and a length of 600 mm, in the amount of 4 pcs. (1A, 1B, 1B, 1G).
2. A wooden bar for planks and cartridges with a section of 30 by 40 mm and a length of 300 mm - 4 pcs. (2); 320 mm - 4 pcs. (3).
3. A bar for connecting the elements of the seat, size 25 X 30 X 315 mm - 2 pcs. (four).
4. Wooden beam for the seat with dimensions 20 X 40 X 320 mm - 8 pcs. (5).
5. PVA glue.
6. Screws, length 80 mm in the amount of 16 pcs. and 45 mm - 4 pcs.
7. Nails on 1 X 30 mm - 16 pcs.
8. Cloth to wipe off excess glue.
9. Colorless varnish.
10. Felt coasters with a self-adhesive surface.
To prevent weakening of the chair structure, all wooden elements are preferably used without knots.
In the material presented, the bar stool is assembled from a common tree species - pine.
The sequence of manufacture.
To make a bar stool with your own hands, you can follow the following sequence:
Step 1
Round the bars intended for legs, a drawer, a jig on all sides using a manual milling machine and the corresponding nozzle.
Step 2
Using a manual milling machine with the same nozzle as in step 1, round the seat blanks on one side along the length and width of 40 mm.
Step 3
Sand all elements of the chair to a smooth surface.
Step 4
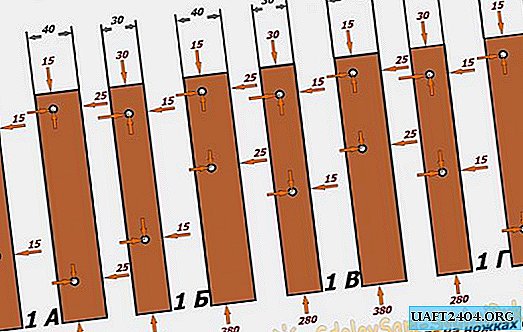
On the legs, drill holes with a diameter of 3.5 mm under the mounts of the cuticles and the drawer. Their coordinates are shown in Figure 1.
Step 5
Based on the photo, lean the parts against each other and through the holes in the legs, mark the place of attachment with screws.

To reduce the stresses that occur during the fastening of the fasteners at the ends of the parts, drill a blind hole with a diameter of 2.5 mm and a depth of about 30 mm.
Step 6
Using self-tapping screws, drill the holes between the legs, the drawer, and the cuticles together.
Step 7
On the resulting chair frame, unscrew the screws so that they do not leave the body of the workpiece, but the ends of the part could be greased with glue.
Step 8
Lubricate the ends of the frame with glue and tighten the fasteners until its head is placed flush with the surface of the beam. Use a rag to remove protruding PVA particles.
Step 8
To the drawers No. 2, with 40 mm screws, attach the beam for fastening the seat from the inner side of the seat so that one side of the beam 25 mm wide rests on the drawer, and at the bottom is flush with it.

Step 9
Unscrew the screws from the workpiece for mounting the seat and glue the side adjacent to the chair with glue. Connect these elements.
Step 10
From the side of the seat, apply glue to the support beam (20 X 25 mm) and, setting the workpieces of the seat close to each other, from the first to the eighth, nail them to the support. Submerge the heads of the nails in the body of the tree. Remove excess glue with a rag.
Step 11
Clean the surface of the chair from dust. Putty potholes, grooves in the tree. Sand all items. Brush evenly apply varnish over the entire surface of the bar stool. Let the product dry.
Step 12
When using as a soft sole under the legs of a chair a single piece of cloth with a self-adhesive film, determine the dimensions of the end part of the leg and based on these data, cut out the corresponding elements from the specified material.


If standard soles are used for these purposes, then stick a self-adhesive felt and cut it with a knife along the contour of the leg.
As you can see, it is very easy to make a bar stool with your own hands.
Share
Pin
Tweet
Send
Share
Send