Share
Pin
Tweet
Send
Share
Send
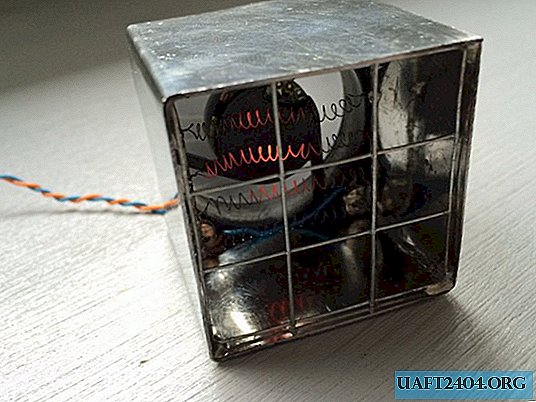
If you are not familiar with this element, then I highly recommend that you take a closer look. In a nutshell, this is a thermoelectric module. It looks square, flat, with two outgoing wires. When a voltage is applied to them, one side of the module starts to heat up, and the other side cools, moreover, in direct proportion.
The cooler device is based on this principle, which will be discussed below.

Will need
- Peltier elements - 6 pieces. The TEC1-12705 model is designed for 12 V and 60 W, you can buy here - AliExpress.
- The power supply from a computer or any other at 12 V and a power of at least 400 W, you can buy here - AliExpress.
- Wires 2.5 sq. Mm. - a couple of meters.

This is from the main, the rest of the details and the tool, see the text.
Production of air conditioning on Peltier elements
We will have a fairly powerful model consisting of 6 elements each 40x40 in size. Under them, you need to pick up two massive radiators, for crimping elements on both sides. I will use one large and two small.

This is how they will look when combined.

A rectangle must be cut from the chipboard.

In which to make another rectangle for two radiators so that they fit tightly into it.

On the back side.

This will be the separation barrier - the cold side of the hot side.
So that the radiators do not slip into the hole, you need to glue two strips of aluminum profile on the side. Buy it is not difficult in a hardware store.

We dilute two-component epoxy-based adhesive (cold welding). And first we glue two radiators together with honey, and then we glue pieces of the profile to them.


We also glue the profile to the large radiator. That's how it looks. The sides of the profile on both sides should be approximately in the onon plane.

Let's drill this sandwich through: two slats on both sides together with chipboard.

Next, we lubricate the radiators with heat-conducting paste and install elements in a row. We don’t confuse the parties; all modules should look towards the bottom.

We cover them from above with a new layer of heat-conducting paste.

And we press the second radiator. We tighten everything neatly with screws and nuts.
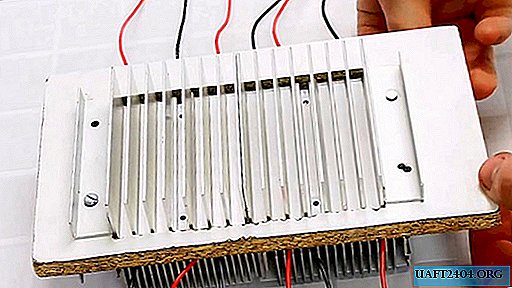
The result is such a design with 12 conclusions.

For ease of connection, we use a terminal block.

As you possibly noticed - three-pin. And all the modules in it are connected in common to the lower bus. And the red leads have 3 elements to the top contact, and the other three to the middle. This division was made specifically for our computer power supply, which has two 12 V buses and is not necessary.


In the chipboard, drill a hole for the wire and connect it to the block.

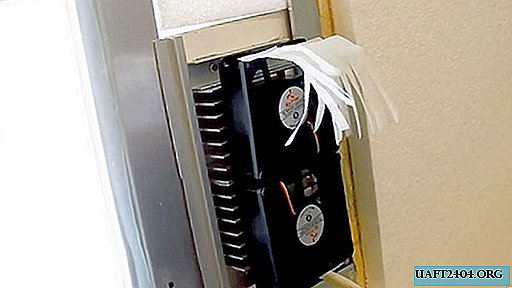
Screw the fans to the radiators on both sides.


On the block, the power is also collected together negative wires and plus two channels.

We connect to the output also through the connection block.

Everything is almost done.
To start the unit, in our case, it is necessary to short-circuit the outputs of the switch with a jumper.

Air conditioner installation
Air conditioning is installed in any window. For this, a brace is made from a curly aluminum profile.

Which will clearly lean in the wings and prevent the entire structure from falling out.
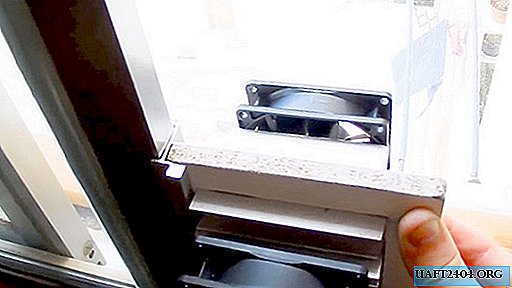
To close the gap not to the closed window, a strip of polycarbonate or other plastic is cut across the width of the air conditioner. And inserted into the groove of the window.

Rava press the entire structure.

As you can see, I have a sliding window, but you have to come up with your own mounting design.
The main thing is that one side of the device is on the street, and the other at home. And there was no draft through the cracks.
Work result
The air conditioner is quite powerful, after all 6 Peltier modules are used. All electric power was 360 watts, which is not enough. Although it is not necessary to compare it with a heat pump because of the very low efficiency. But even such a model is enough to cool a small room.
Here is the result at the first start: the initial temperature in the room is 24 degrees Celsius.

After about an hour of operation, the temperature dropped to 20 degrees, which, in my opinion, is an excellent result!

Share
Pin
Tweet
Send
Share
Send