Share
Pin
Tweet
Send
Share
Send
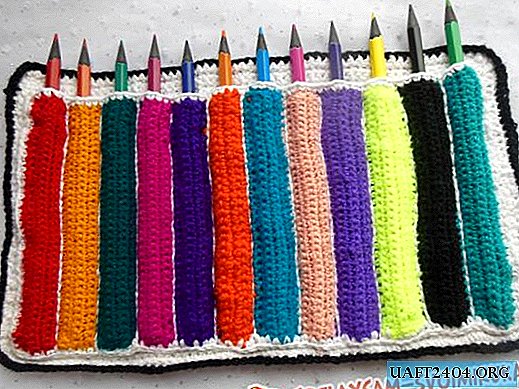
Before you start knitting such a pencil case, carefully consider the color pencils of your child. Without a handy example, it’s difficult to immediately distribute color blocks or choose the right shades.
In general, take the required number of balls of the desired colors (12, 24, 36, etc.), plus white, black balls for knitting the outer base and its decoration. The hook should also be taken in a suitable size (usually this indicator is equal to the thickness of the thread), but massive and rough materials should be avoided, because a large structure will not look very attractive.
Photo 2.


Knit it with a single crochet (st / b.n) along the entire length in straight rows. Each block accounts for 8 to 10 such rows.


You can combine the colors as you like, depending on personal tastes, as well as the preferences of the child himself. But still, the most optimal option would be an even alternation of cold and warm tones.

Then tie the finished striped rectangle with st. n white yarn around the perimeter, highlighting and aligning thereby all its sides.

And now our color part is completely ready.

The white back wall should also start by creating a chain and fitting. This rectangle should be slightly larger than the previous one, and its sides should protrude several millimeters from the edges of the color blank.

Knitting two of these details, frankly, is not a fast job, but which of the easy, understandable and simple ones is for sure.
At the end, and to the white rectangle, also make the contrasting frame a black yarn.

Now sew two pieces of the pencil case on its side and bottom, leaving the top part completely free.

The last stage is the separation of narrow color cells. To do this, put the thread at work (to be more precise, from the bottom of the pencil case) and pull out the loops one by one, passing each of them into the previous one until a chain is formed along the entire cell (up to the top white border).

Thus, you not only connect the walls of the product, but also highlight each “pencil” with the familiar white frame.

For home use, the canvas with pockets can already be hung in this form above the table. So the child will always see pencils, know where they are (that is, never rub) and will get used to storing them in one place (another plus - he will not scatter them all over the room). But for the transfer it is better to sew a narrow ribbon to tightly tie a twisted tube and not lose your pencils. It will be convenient for a young student to wear such a pencil case in a briefcase.


Share
Pin
Tweet
Send
Share
Send