If you have to work a lot with wood, then the jointer in the workshop will never be superfluous. You can make a very simple desktop version of the jointer with your own hands. To do this, you need an electric planer, plywood and chipboard.

First, it will be necessary to cut a piece of plywood 18 mm thick (dimensions - 56x18.4 cm). Next, the author makes a marking and cuts a small piece on the band saw so that you can "plant" an electric planer.
The edges of the plywood will need to be cut at an angle. For the base, you can use both plywood and particleboard (dimensions - 40x25 cm, thickness - 18 cm). The author steps back from the edge of the base 8 cm, drills holes and then fastens a piece of plywood.

The main stages of work
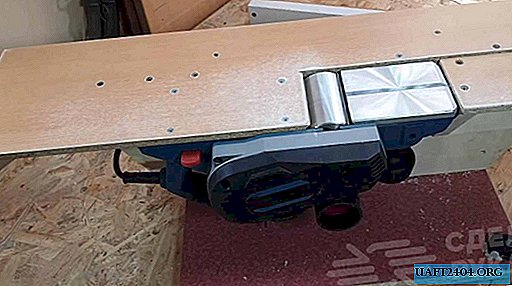
At the next stage, the author cuts a piece of chipboard 8 mm thick (dimensions - 70x18.2 cm). From it you need to cut a piece of rectangular shape to install a planer. Then this piece of chipboard must be screwed to the base of the planer, having previously removed the base plate.

At the next stage, it is necessary to fasten the chipboard with a plane to the base. It will also be necessary to make the missing part of the table from pieces of the same chipboard, and also fasten it. The result is a flat work surface.

Then it remains only to make a clamping bar for blanks. For this, the author uses a piece of chipboard 25 mm thick and a piece of plywood 10 mm thick.

For more information on how to make a table jointer with your own hands from an electric planer, see the video on the site.