Share
Pin
Tweet
Send
Share
Send
Materials and tools:
- bar 50x50 mm;
- solid wood block 60x40 mm;
- a circular saw;
- hand planer;
- drill;
- wood drill bit 35 mm;
- a pair of strong clamps.
Making the cuttings
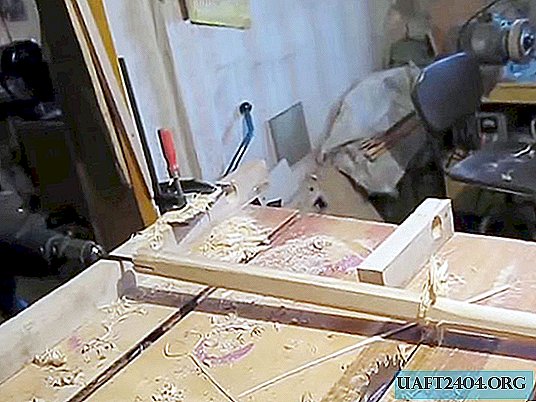
To grind the handle, you need to assemble a conductor with a guide. For this, 2 bars of 60x40 mm are used. They are made through a through hole with a pen drill, the diameter of which corresponds to the thickness of the desired shank. The example uses a 35 mm feather. A hole is made at the edge of the bar to cut one of the edges. In this case, the workpiece cuttings will not jam.

One drilled block is placed at the edge of the table. It is located with the cut edge up. A knife from a manual planer is laid on it. The blade is angled so that the gap narrows from the edge of the countertop. Its cutting edge is located above the middle of the hole. From above, the knife and bar are pressed against the table with a clamp.

The second bar will be clamped with a clamp to the countertop at an arbitrary distance from the first. Its task is to center the workpiece so that it does not play along the length. This bar is best set after the stalk has been grinded to the middle.
A bar of 50x50 cm is used for the manufacture of the handle. On a circular saw, it is necessary to cut its edges at 45 degrees, giving roundness. One end of the workpiece is turned with a planer onto the wedge so that it can enter the hole on the bar with a knife. At the second end of the rail, a shallow longitudinal slot is made into which the blade of the pen drill is pressed into.

The pointed end of the workpiece is inserted into a block with a knife. The drill shank fixed on its second side is clamped in the drill chuck. Then turning on the drill, you need to gradually press on the workpiece, pushing it through the beam. As soon as it reaches 40-50%, the stalk should be inserted into the second block to give an additional fulcrum. Having reached the edge of the workpiece with a clamped drill to the plane blade, you need to stop. The remaining non-rounded part should be trimmed.


In this way, of course, it will not work to make a lot of cuttings for sale, but for their needs this is quite an effective adaptation. If you work a little, then the drill does not overheat, so the production of cuttings will not harm the tool.

Share
Pin
Tweet
Send
Share
Send