Share
Pin
Tweet
Send
Share
Send
Faced with the need for repairs in the bathroom, the first question that arises is: whom to entrust with the performance of such work. The following problem automatically appears: how to find a good master so that he will realize your dream. In the search process, a third question appears: how much does a small bath repair cost? And so on.
I offer a single solution to all these problems: do it yourself. What are the benefits?
- You do not need to be on duty next to the master.
- Saving money spent on all repairs will be 50%.
- You get moral satisfaction from the work done by your own hands.
- The experience that comes during the repair becomes an incentive for further transformations.
If these benefits are really significant, then after familiarizing yourself with the workshop, you will learn how to install the bath yourself, replace old galvanized pipes with PVC, lay the tiles, install the rack ceiling, and how much it will cost. At the end of the article we will analyze the costs and calculate the percentage of real savings.
Preparatory work: dismantling old material

Since we are going to make repairs in a room that was previously operated, the first step is to dismantle the old finishing material. In our case, the walls of the bathroom were finished with plastic panels, tiles lay on the floor. PVC is removed very simply, but it will take a longer time to remove old tiles, especially if your walls are covered with such material. Old tiles are well beaten with a chisel and a hammer. When carrying out such work, it is very important to remove all irregularities as much as possible.


The walls of our bathroom are made of fiberboard, in other words, of dense hardboard nailed to the transverse bars. From the point of view of reliability, such a material is not very suitable for tiling, therefore, to increase the adhesiveness (adhesion), it is necessary to treat the fiberboard with a concrete contact with abrasive chips. Which we did.


In duration, such work takes one day.

Replacing galvanized pipes with PVC
For such work you will need a thermal welding machine (iron) and special scissors for trimming pipes. Also, before dismantling old equipment, you need to make an accurate diagram of the new pipeline and indicate in it all the necessary connections and transitions.
A feature of such a water supply system is that all fittings are firmly welded to the pipes, as a result, the system becomes non-separable and hermetically reliable.

Work starts from the riser. Since welding equipment requires safety precautions, carefully read the instructions for the device. To connect the pipes, the apparatus must first be heated to a maximum temperature. Then lean the pipe and fitting against the melting element for 15-20 seconds. After time, quickly insert the plastic elements into each other. For full grip, it will also take 15-20 seconds. Carrying out sequential welding of parts according to the developed scheme, you will gradually create a durable pipeline that will last for many years. The dismantling of pipes and welding takes from 3 to 4 hours.
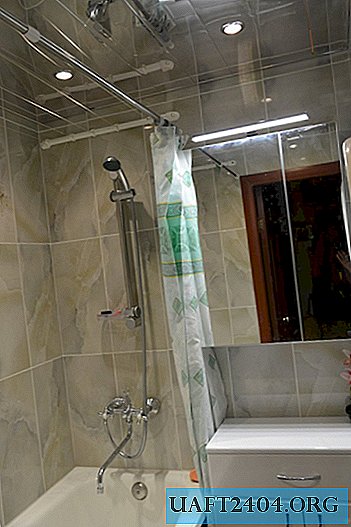
Installing the bathroom on a solid base
The stability of the bath is very important, since the first row of tile will lean not on it. Therefore, for reliability, the bath must be fixed in one position. This applies to both cast-iron bathtubs and metal.
In order to do this, a wooden block is mounted to the wall at the level of the rear side, as well as on the sides.

Then the bathtub is put on this frame. The legs are adjustable in height with bolts, and the gap between the wall and the bathroom is filled with sealant. During installation, you must constantly check the level readings.
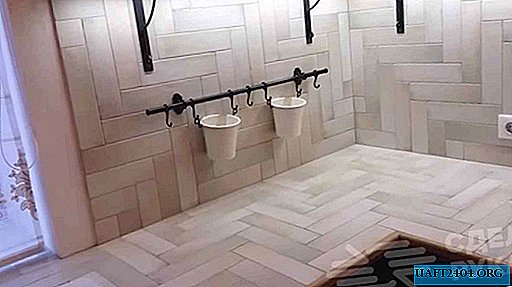
Laying tiles on fiberboard
As noted earlier, fiberboard is not the best basis for tiles, so in this case you need to minimize the risk of peeling of the material. To ensure a strong connection, tile adhesive with increased ductility should be chosen. Knauf Fliezen Plus for 244 rub. over 25 kg perfectly copes with this task. According to the instructions, with a layer thickness of 6 mm, the bag is enough for 6 m. In fact, due to the roughness of the walls, the material consumption increased significantly, and as a result, four bags were required for all the work.

The first tier of tiles is the most important, therefore, reconciling its geometry takes a lot of time. In the process, you can focus on the edge of the bath, as well as constantly check the level of correct adhesion of the tiles in all planes.

In order to set the right direction, in the first tier you need to install the first and last (beacon) tiles, and then set these two elements at a common level. Subsequent tiles in a row will be installed taking into account these guides. At the end of the work, the beacon tile can be torn off and reinstalled in compliance with the tile gap, which is set using mounting crosses.


A few words about how to apply tile adhesive to the surface. To evenly distribute the composition when laying the tiles, a notched trowel is used. Such a tool saves glue and improves adhesion. With a large roughness of the walls, the height of the clove may not be enough to maintain the correct geometry, in this case the adhesive is applied not only to the wall, but also to the tile, but in the opposite direction.

When laying tiles in the area of water connections, you will need to make a hole in the tile.

I will say right away that for this operation you will have to purchase a special diamond crown of the desired diameter. The cost of such a drill ranges from 270 to 1000 rubles. I bought the simplest crown from the company "Practice", and she did an excellent job.

For an inch pipe, a 40 mm diameter crown was ideal. It is worth noting that ceramic tiles are remarkably cut using a grinder, only for such work you will need to purchase a ceramic disk with a smooth edge. Its cost ranges from 150 to 350 rubles. To make small holes, for example, for electrical wiring, use a conventional drill.


When carrying out work from the side of the bath, the tile rests on a metal board, which eliminates the sliding of the material. The same support should be provided on other walls of the repaired building. Therefore, before continuing the circular row, you need to fasten the supporting profile to the remaining walls and only after that lay the upper rows on it.


The next day, when the glue hardens well, you can dismantle the guide rail and finish working with the lower tiers. As you can see, it takes two days to lay the tiles on an area of 10 m.

The final step is grouting. This is done with a special rubber spatula. Excess mixture is wiped with a damp cloth. The place where the tile joins the bathroom can be covered with a plastic side or left the seam open.

Having dealt with the walls on their own, laying the floor tiles seems like a trifle. The basis for porcelain stoneware is applied according to the same principle using a notched trowel. The seams are overwritten on the second day.
Installation of a rack ceiling
Slatted ceilings appeared recently, so the technology for their assembly is not known to everyone. This finish applies to suspended structures. With it, you can change the lighting system of the bathroom or hide the irregularities of the old ceiling.
The rack construction kit includes:
- U-shaped metal profile.
- Comb-stringer designed to fix the rails.
- Adjustable suspension.
- Decorative panels.
Installation of the structure begins with marking for the u-shaped profile and installing an adjustable suspension. The profile is attached to the wall around the entire perimeter of the room, metal suspensions are screwed into the ceiling. On an area of 2 m (1.5 * 1.3), it is enough to install four suspensions (two for each comb).

After installing the mounting system, you can start laying the rails. I want to give advice, when buying decorative panels, ask the seller to shorten them to the desired length in place. For example, in our case, with a bath length of 1.5 m, each panel can be cut exactly in half, as its initial length is three meters. This will greatly facilitate the transportation of material to the house.
If you plan to mount spotlights in the ceiling, then the holes for them need to be cut in advance. This can be done using a conventional drill or metal punch.


To make the slats easily fit into the u-shaped profile, make them 0.5 cm shorter. When installing, they must be securely fastened to the comb. It will take you no more than three hours to complete such work.

How much does a small bath repair cost: costing and percentage savings
Since we carry out the repair of the bathroom on our own, only the costs of finishing material will be included in the calculation.
Initial data:
- The size of the repaired premises is 1.5 * 1.3 m;
- The surface area of all walls is 10 m;
- Wall height 2.2 m;
- The ceiling area is 2 m.
Finishing material costs:
- Facing tile 10 m (price per meter 840 rubles) - 8400-00;
- Decorative element (3 pieces for 450 rubles each) - 1350-00;
- Floor tiles 2 m (price per meter 1100 rubles) - 2200-00;
- Tile adhesive 4 bags of 25 kg each (price per bag 244 rubles) - 976-00;
- Grout mixture 2 kg - 120-00;
- A bar for installing a bathroom - 120-00;
- Set of mirror rack ceiling 6500-00;
- Spotlights 4 pcs. - 720-00;
- PVC pipes (for the whole set) - 344-00;
- Welding machine - 2500-00;
- Scissors for PVC pipe - 260-00;
- Diamond crown for ceramics - 270-00;
- The cutting disc for the grinder is 150-00.
Total cost was: 23910-00.
And now to summarize. Most specialists involved in repair work establish a direct relationship between the cost of work performed and the price of building material. For example, laying 1 m of tiles can range from 80 to 100% of its price. And this is provided that the dismantling of the old material is paid separately. The same can be observed during other finishing works. As a result, the cost of repair doubles. In other words, when we do repairs on our own, we get 50% money savings. Whether it is a lot or a little is up to you.
Inviting a specialist to ourselves, we pay for the skill and quality of the work done. For some, the need to call the master is associated with a lack of personal time, someone is simply not sure that he will cope with such work independently. And if you look at the problem from the other side? Often people simply do not want to try, citing a lack of experience. From my point of view, guided by this master class, any able-bodied man is able to master such a repair, and then rightfully be proud of the creation of his own hands.
Share
Pin
Tweet
Send
Share
Send