Share
Pin
Tweet
Send
Share
Send
Future Bed Size
I had a mattress 2x1.60 meters. It was from this that I repelled myself when I calculated the size of the bed. The width of the room is 2 meters. It turns out that if you clean the width of the mattress from 1.60 meters, then I still had 40 cm left for the side shelves. Consequently, the shelves on both sides will be 20 cm wide.
Materials
Having counted all the sizes of the bed, and depicting this on paper, I calculated approximately how much material is needed. I had to buy:
- 2 sheets of laminated particleboard;
- 2 bars 200x15x5 cm;
- 8 bars 200х5х3 cm;
- 1 sheet of fiberboard with a laminated side in white;
- Finished metal frame with slats, just the size of my mattress 2x1.60 m;
- Gas mechanism for opening the frame;
- Accessories for shelves: awnings with a spring, mortise handles;
- Edge for chipboard;
- As well as screws and konfermaty.
For all this, I spent 12,000 rubles. In addition, since I do not have a special machine on which I could dissolve sheets of chipboard to the desired size, I ordered this service in a hardware store. True, I had to wait one week. But all the corners were even, and they delivered the right dimensions, so I immediately began to assemble the bed. That's why it is important to make an accurate drawing of the future bed in advance.
Making a double bed
So, for starters, I took a beam of 200x15x5 cm, and cut off from it two pieces 90 cm long.

This is exactly the height of the sides. These are the legs, which should be 4. Then, retreating from the floor 30 cm. I made a groove on both legs for a wooden block 200 × 5 × 3 cm long, and fastened the legs with this block using self-tapping screws.

Then on both sides I attached sheets of laminated chipboard 200x90 cm to the legs with confermat. For confermatov it is necessary to have a special drill, and a bat.


Just need two of these elements. Since the width of the bar is 15 cm, and adding to this the width of the chipboard 1.5 cm on both sides, the width of the side walls is 18 cm.
After that, you can begin to manufacture the back of the bed. It is necessary to assemble a frame to which a sheet of chipboard 165x90 cm will be attached. I attached a 5x3 cm bar to the sides on both sides, and attached chipboard to the confermats to it.


Since there will be a load on the back of the bed so that you can not lean on it, and the chipboard does not bend, for stiffness, I added two bars and attached them vertically to the screws.

From the front of the bed, it is also necessary to attach a sheet of chipboard 200x40 cm in size.

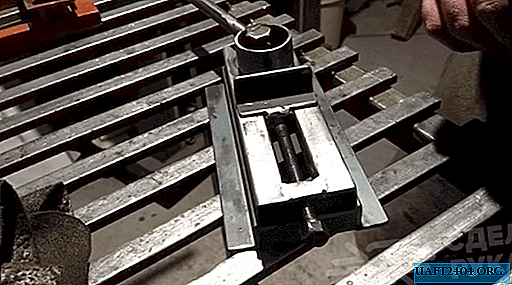
After that, I took up the metal frame. As a rule, it should lie on wooden blocks, which should be on the entire plane of the bed, so that the load is distributed evenly. Therefore, it is necessary to attach the beam at a height of 30 cm from the floor to the rear, front and side parts. On the sides, the beam should not be along the entire length, but should have a place for mounting the mechanism somewhere around 40 cm.


Next, I attached a metal frame to make sure that the dimensions are accurate, and after that I began to fasten the mechanism.

First you need to unscrew the gas pipe with a wrench, and attach the mechanism without it.


I put the level on a wooden block, in order to make sure that the frame will lie exactly on the bars. Then he twisted the holders with screws.


And so on both sides. Then I again fastened the gas pipes so that the filler was at the top, not the bottom. The fact is that the mechanism will open in any way, but if it is not set as shown in the illustration, it will quickly fail.


When the frame is fastened to the mechanism, it will be constantly in a suspended state, and in order to lower it, a load on the entire plane is necessary. Therefore, do not be alarmed if it is lowered with great difficulty. When a mattress is laid, which weighs approximately 15 kg, and which gives a load to the entire plane, the mechanism will work perfectly.
Then I made an internal partition, dividing the inner department into two parts. To do this, I used a sheet of chipboard 200x30 cm in size, and attached a bar to it on top of the screws. By the level of side bars.


Thus, the frame evenly rests on the side bars, and on the beam which is in the middle. In the inner part, where bedding will be folded, I put fiberboard with a laminated part of white on the floor. I cut it with a jigsaw exactly to the size of each compartment, and simply laid it on the floor.
Then I additionally fastened some fastenings with metal corners. Especially in places where there will be a load.


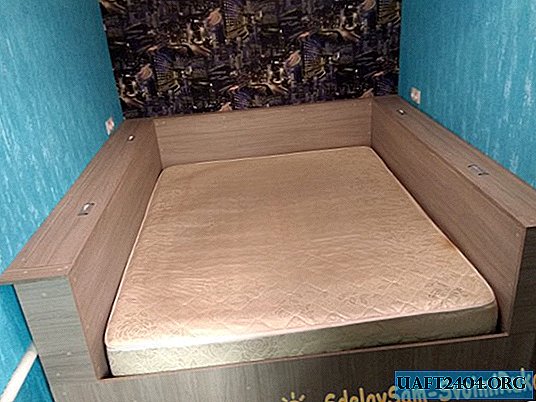
At this stage, it was already possible to sleep on this bed. It remains to make the side shelves. This is the main feature of this design. First, I determined the depth of the shelves, attached on the sides and in the middle the bars on which I placed the chipboard.

Next, I measured the covers that will open. I had to find the right fittings for this idea for a long time, and I settled on this option. These are canopies with springs, which are at the same time a limiter. These canopies are attached to a wooden beam of 200x15x5 cm. Thus, 2 sets of canopies for the left and right side walls are needed.


After that, I evenly measured the marks on the opening covers in order to cut out the holes for the mortise handles. The handles on the back of the lid are attached with the bolts that come with the kit.

The final step in my work was sizing the edges to the prominent sides of the chipboard. This service could be ordered where I ordered slicing chipboard. However, in this case I had to wait even longer, and I already wanted to quickly move to a new bedroom. In addition, this service seemed to me too expensive. Edge gluing is easy. To do this, I bought the approximate amount of the edge that I need to seal the prominent places. I cut off the size of the edge for the required fragment, and, wiping it with a heated iron, I conducted several times along the edges. Then he cut the excess with a construction knife from the edge, which went beyond the thickness of the chipboard. I also bought special stickers to match the chipboard, which are designed to close the hats of self-tapping screws and confermat so that they do not catch the eye.

This work seemed to me difficult at the beginning, but in fact, everything was very simple. It took me 3 days to make a bed. The bed came out very comfortable and spacious. I found many uses for the opening compartments on the sides. Perhaps this version of the bed will inspire you to make a similar design, which will undoubtedly fit perfectly into the interior of any bedroom.

Share
Pin
Tweet
Send
Share
Send