Share
Pin
Tweet
Send
Share
Send
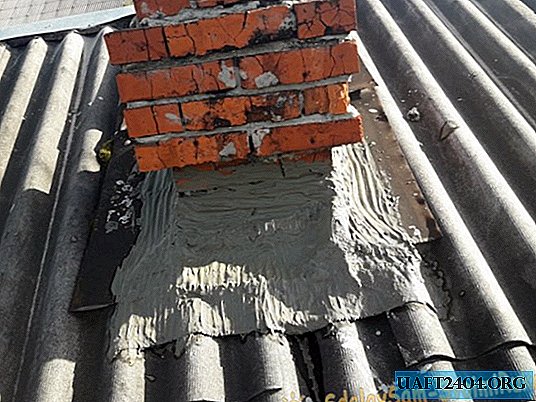
Surely, many owners of stove-heated houses are faced with such a problem as rainwater leakage on the outer walls of a brick pipe, through the roof and attic, to the ceiling of the house.

Especially with heavy rain. How tightly do not push the sheets of metal to the pipe, still water oozes. And after all, not to foam such a gap with ordinary mounting foam is very unsafe, even with a thick brick pipe. And I did not meet and did not find any refractory foam in stores, how many I did not look for ... and it is not known whether such exists at all in nature! After thinking a little, recalling all non-combustible materials in my memory, I chose asbestos fabric and heat-resistant tile adhesive based on cement. Asbestos tissue does not burn, fungus and mold do not stick to it, it is not susceptible to decay ... In general, I did not find any disadvantages of asbestos tissue, just for this purpose. And heat-resistant tile glue, unlike pure cement, will not crack and crumble from temperature extremes and weather conditions.
Will need
- Coarse and thick asbestos fabric (this is usually used in gas-electric welding, such as spark protection).
- Scissors.
- Cement based tile adhesive (1 two-kilogram bag).
- Water.
- Bucket for mortar.

Do-it-yourself clearance
First, prepare a solution in a bucket. Pour a kilogram of glue (half a packet) into a bucket and dilute it with water until smooth. The solution should be liquid. By consistency, something like kefir, something like this.

In general, it is necessary that the solution can soak asbestos tissue immersed in it. If water is poured and the solution is too liquid, add more glue. And in no case add sand! Not a gram! Otherwise, the frozen solution will be washed away by rains. A clean, cement-adhesive mortar, after final hardening, will be smooth and glossy, and therefore will be less susceptible to dripping water, and the environment as a whole. Now you need to raise all this stuff to the roof. Do not forget the bag with dry glue - we still need it. Asbestos fabric will be cut immediately in place, so as not to miss the size of the desired pieces. So, after examining the place where the pieces of asbestos fabric soaked in the solution will lie down, we cut this fabric into pieces of the desired size. I cut the rectangles, so that then I fold the soaked fabric in half. Now we lower the fabric into a liquid solution and carefully jam it there so that the solution properly impregnates it.


We take out the fabric from the solution and if the gaps between the pipe and the roof are wide enough (like mine - from a centimeter to two!), Fold it in half, as the extra thickness will not let it fall or slip into the gap, into the attic (liquid glue slippery enough!).

We cover the gap with this impregnated fabric. Next, we repeat all the above procedures with a cloth and a solution, until we close all the large gaps and gaps, after which we can peel off and rest for 30-40 minutes, until the impregnated fabric grabs at least a little and becomes harder.

After the break, we climb back onto the roof, check if everything is in order so that nothing fails anywhere and dilute the solution from glue and water thicker than it was before, so that they can thoroughly cover up all remaining small cracks, as well as smooth over small ones and large irregularities.

By the next morning, the solution, with asbestos tissue embedded in it, would completely petrify. The main thing is that during the solidification period it does not rain. So do not be too lazy to look on the Internet and find out about the weather in advance so that all this hard work is not done in vain.
Eventually; it turned out to be a rather strong and dense belt around the pipe that will not let rain water into the attic - such a cement-based glue tends to shrink when it hardens, which leaves almost no chance of water.
And the grooves, which I specially made my five, will not be superfluous, for a better flow of water. Thus, with the help of asbestos fabric and cement-based tile glue, we saved ourselves from the problem of the damp ceiling around the chimney, during heavy rainfall, as well as during long autumn rains.
Share
Pin
Tweet
Send
Share
Send