Share
Pin
Tweet
Send
Share
Send
For control: the height of the baseball cap wedge should be 15 cm.
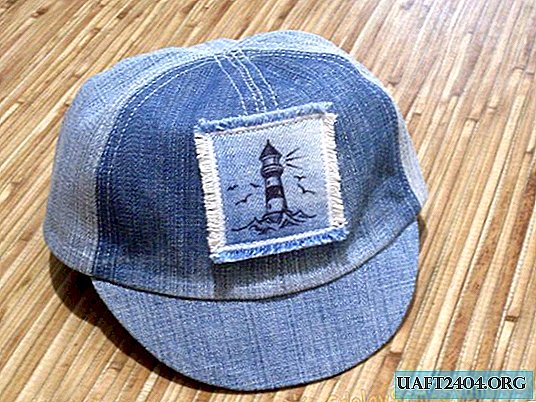
Probably, there is not a single mother-needlewoman who would not alter the boring jeans in some sort of wardrobe item for her children. Things from always up-to-date blue denim, with life or artificially created scuffs, are worn with pleasure and for quite some time by little fashionistas both in quality of clothes and in the form of various accessories.
One of these, for example, is a denim baseball cap. Practical, fashionable, she will not only protect her beloved son from the bright sun during the summer days, but will also become his favorite headdress, captivating with its extraordinary convenience.
Sewing a baseball cap with your own hands is very simple. It is enough to stock up on jeans, and also use the finished pattern attached to the master class.

Before starting work, jeans must be torn, washed, dried and ironed well.
The following baseball cap details should be carved from them:
1. Front wedge (2),
2. Side wedge (2),
3. Rear wedge (2),
4. Visor (2),
5. Whip (2).
The pattern is already given taking into account all the necessary allowances for seams and processing.
Tip: it’s best to tailor a baseball cap from soft, not too dense jeans, in order to avoid a large thickness at the places where the wedges connect to each other, which will be quite difficult to flash. And the product itself can turn out to be too rude and unpleasant to wear.

Sewing baseball caps should begin with the connection of wedges.
The front and side wedges should be sewn together along the side sections with a 7 mm seam.

The seam allowances of the wedge connection must be ironed and stitched close to the seam.

After that, you need to cut the allowances close to the finishing lines.


From the wrong side over the seam of wedges grinding, you should sew a cotton slanting inlay. For convenience, you must first draw it or pin it with pins, positioning symmetrically with respect to the seam. At the same time, double finishing lines should be obtained from the face.


In the same way, you need to attach the rear wedge of the baseball cap. Then, in exactly the same way, but in mirror image, you need to collect the second part of the baseball cap.


After that, according to the technology described above, both parts of the baseball cap must be sewn together.

The front part of the baseball cap can be decorated with your own hands or a jeans applique purchased at the store, scribbled it 3.5 cm from the bottom cut.

One part of the visor should be sealed by gluing to it a special gasket (for example, doubler). Then both parts of the visor must be applied face to each other and sewed along an external rounded section (seam - 7 mm). The seam allowance of the grind must be cut with the ends of the scissors, as shown in the photo.

Next, the visor needs to be unscrewed, and the seam allowance is sewn onto its lower part (close to the seam).

Then the visor must be ironed from the wrong side. Both layers of the visor should be swept off among themselves according to cuts of stitching to a baseball cap.

A visor prepared in this way must be pinned to a baseball cap.

The details of the straps should be folded in half (face inside) and stitched on the short and long sides (seam - 5 mm).
Then they need to be straightened to the face, with a thick needle, straighten the corners and properly ironed.

A soft velcro should be sewn on one strap and a hard one on the other.

Hooks should be seen on the back of the baseball cap (along the arcuate notch), stepping back from the bottom cut of 10 mm.

Next, the arched neckline on the back of the baseball cap must be edged. To do this, you first need to sew a slanting inlay on the front side of the baseball cap, laying a line in its ironed fold. The tape should be applied face to the face of the product.

Then the inlay must be wrapped on the wrong side of the baseball cap, sweat with manual stitches. Then, on the edge of the arcuate cut, 2 finishing lines should be laid. The second line at the same time should fix the take-off edge of the inlay.

Next, you need to edge the lower section of the baseball cap.
The first line along the oblique trim must be laid in the same way as when processing an arcuate incision.

The seam allowance needs to be sewn onto a slanting inlay, having departed from the seam no more than 1-2 mm.

The take-off edge of the inline also needs to be fixed with a machine line, passing close to its ironed bend.

The oblique trim should be wrapped on the wrong side of the product and swept with oblique hand stitches.

For the convenience of further processing, the bottom of the baseball cap must be ironed from the inside.
The ends of the tape must be tucked and secured with hidden hand stitches. In the same way, you need to sew the take-off edge of the inlay to the seams of the wedges.
Sewing threads can then be deleted.
If necessary, the finished baseball cap can be gently steamed.
Link to download patterns: (available only to registered users)
Attention! You do not have permission to view hidden text.
Share
Pin
Tweet
Send
Share
Send