Share
Pin
Tweet
Send
Share
Send
So, let's start and take the following for the master class:
• Watercolor rectangles 19 * 29.6 and 20 * 29 cm;
• Turquoise paper for scrap 30 * 30 cm, two sheets;
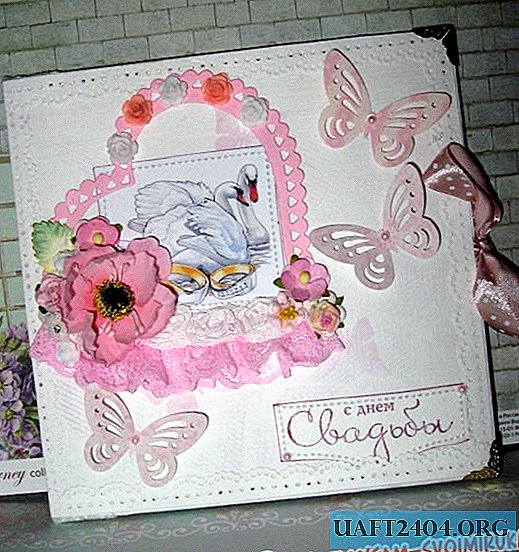
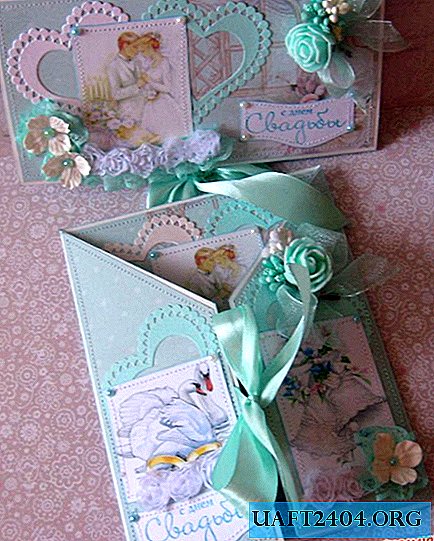
• Wedding pictures: a pair of newlyweds, a pair of swans, a pair of wedding bells;
• Cut down elements: champagne and a pair of glasses of turquoise two sets, 4 mint hearts and 2 white pearlescent;
• Stamping "Happy Wedding Day" and a pad with turquoise ink for tinting;
• Hydrangea flowers are white;
• Lace mint;
• Satin ribbon and mint color organza 25 mm wide;
• Chiffon roses on a white ribbon;
• Half beads mint and turquoise 4 mm and 6 mm in diameter;
• For a bouquet: white rose and mint roses, white and turquoise stamens;
• A printed rhyme for congratulations to the newlyweds;
• Glue pencil, double-sided adhesive tape, pencil, ruler, elastic, thermal gun and lighter.

The basis of our products will be watercolor paper, we put both rectangles in front of us.


We horizontally expand the rectangle of 20 * 29 cm and divide it into three such parts: 10.5 * 10.5 and 8 cm, draw a line of bends and fold the blank of the envelope.


The rectangle for postcards is divided into three parts 7.4 * 14.8 and 7.4 cm.


We also draw bending lines and add the base of the card like this.


From bottom to top we retreat 12 cm and draw lines to the corners. We cut it off and this is the basis of the postcard.


The edges of both bases are tinted with an ink pad.


Both of our products will be tied in a bow, so for them we cut two strips of satin ribbon, we burn the edges of each cut and glue in the center, as in the photo.


From scrapbook paper for postcards, we cut out such blanks.


These are for the envelope. Rear and interior immediately glue to the basics on tape.


And we decorate the front and the large interior onto the postcard with cutting and pictures, as in the photo.


The edges of all elements are also tinted. We glue all the pictures, the rhyme and the inscriptions and sew all the typewriter.


Now we glue all the scrapbooking on the basics and sew on each side.


We glue champagne glasses inside.

Outside we glue on bouquets, lace, flowers and half beads.


Thank you for your attention and successful creation to all!


Share
Pin
Tweet
Send
Share
Send