Share
Pin
Tweet
Send
Share
Send
Art historians believe that such a technique for knitting lace was created in ancient Egypt. And only in the XVII century found its distribution in Italy and France, and then throughout Europe. This type of needlework came to Russia as French lace - tatting.
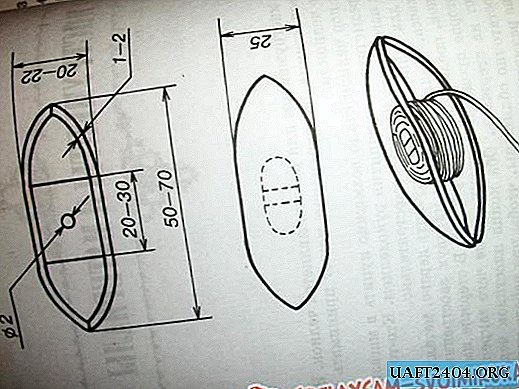
Any cotton threads No. 10, 20, 30 are used for weaving. Tatting with shuttles is woven - you see them in the photo. These are two crescent-curved plates between which there is a jumper on which the thread is wound. The ends of the plates should be bent so that the thread, winding on the jumper does not slip past, holding in place until it is pulled by lace. Scheme of how the shuttle should be given in the photo.
All weaving technique is based on a tatting knot. Double tatting knot consists of forward and backward loops. This is the most difficult element in this technique. So, having mastered it, you will easily submit to all the equipment and you can weave wonderful products.
I suggest you to make a decorative brooch - a rose from simple motifs woven by this technique.

For work we will need: shuttles 2 pcs, scissors, knitting hook No. 1, darn needle for untangling knots, threads Iris, pin.

In order to make such a brooch a rose, you need to weave five motifs from your chosen threads. I have this poppy thread.

In order to understand the pattern (rapport) of weaving tatting technique, you need to know the following notation: K - ring, PC - half ring, P - picot, D - arc. So, we proceed directly to the weaving of our petals.
Motive rapport
1.1 - to (4p5p5p5p5p5p1).
2.1 - to (5p5).
2.2 - d 2p2p2 (5p5) (5p5) 2p2p2.
3.1, 3.3 - to (5p5).
3.2 - d ((2n) 7 2).
3.4 - (2p2).

After that, the last, sixth motive will be enough to weave, without weaving the third row. He will be the middle of our rose.

I soaked all the finished elements in gelatin, for that. That they would be tough enough and keep their shape.

Now let's start picking our flower from the petals. To do this, we twist the last sixth, the Sámi small element into a tube, thereby grabbing it with a thread.

Add the remaining five to this element one at a time, also fastening them with a needle and thread.

We should get such a rose.

I decorated the middle of the flower with a bead so that it would glisten romantically.

In the sewing store I bought a safety pin for our brooch

We only have to attach our finished flower to this pin. I did this with the help of a thread with a needle again - I sewed a rose to the base.

Our brooch is ready! You can safely pin her up.

Over time, if the rose becomes limp and becomes not so stiff, it will be enough to starch it with aerosol. They are now sold in household chemical stores. And then iron the petals. Such a rose will not leave you unattended!
Share
Pin
Tweet
Send
Share
Send