To get the dubious pleasure of using the remote, you have to put together a small circuit. The scheme is as follows:
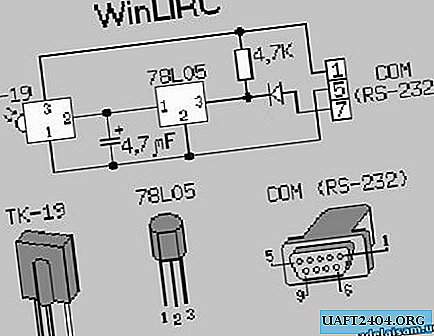
Almost any element can be replaced with an analog. I bought the first photodetector for the TV - "TK-19", although there were some other analogues on sale. As they usually say: the circuit works immediately and does not need to be configured. All this disgrace is connected to any COM port.

The scheme can be beautifully designed - for example, from a rubber horse we got a pretty nice terminator. The receiver is located on the header.
You will also need the WinLIRC server itself: //winlirc.sourceforge.net/
There is also a plug-in for WinAMP, so that it can be used from the bed.
Installing it is not difficult, it is rather problematic to configure it. An indicator of the program’s mood will be the blinking of a green indicator in the tray when you press the buttons on the remote control.
Suppose you correctly soldered a circuit from serviceable parts. Accordingly, it must be working. We go to //www.lirc.org/ and follow the link "supported remote controls" to //lirc.sourceforge.net/remotes/. We are looking for your remote there. If there is - lucky, download the config for it; no - not scary. We connect the circuit to a free COM port. We start WinLIRC. For definiteness, I describe the order of poking by buttons in version 0.6.4 (I do not remember what was there in earlier ones). If it goes into tray, then right-click on "Toggle window" -> "Reconfigure". Select the port (COM1, COM2) to which the receiver is attached. For the circuit above, the “Receiver Type” parameter must be a DCD. Speed - 115200 (by default) Sense - autodetect (by default) If we managed to find the config for your remote, then go to "Config" -> "Browse" and select it. We pass to the item "Everything is ready." If the finished config could not be found, begins to teach the program to his console. So:
1. In the "Config" window, write MY_REMOTE.CF (or something like that).
2. Click "Raw codes". Poke any buttons on the remote. The numbers in the window should run. So everything is in a bundle. Close with a cross and go to
3. Learn. They will ask you
This will record the signals from your remote control
and create a config file for WinLIRC. Please enter a name for this remote.
You must enter the name of your remote. Hereinafter, the names are best given in Latin (English) letters, without spaces.
4.
When learning and analyzing signals, a margin of error is used in order to
handle the normal variations in the received signal. The margin of error ranges
from 1% to 99%. The default is 25%, but larger values might be necessary depending
on your hardware and software. If you are having trouble using your remote,
try increasing this value. You may enter the allowable margin of error now,
or press ENTER to use the default. Desired margin of error for this remote?
(1-99, enter = 25)
A lot of words, just press "Enter"
5.
Step One: Determine signal gap, signal length, and repeat codes.
-----------------------------------------------------------------------------------
You will be asked to press an arbitrary button a number of times.
Please hold it in for at least one s second each time, and wait at least
one second between keypresses. If you want to manually enter a signal gap
and signal length, you may do so now (ie, "31000 52").
Otherwise, just hit ENTER. Gap and length?
Again, a lot of words, just press "Enter"
6.
Press a button. Please wait a second and press it again.
Press and release any button (on the remote control). Wait a second and press and release it again. A line appears
Baseline initialized.
After that, we press the SAME button ten (or a little more times) until we reach zero.
Please wait a second and press a button again (10 left)
Please wait a second and press a button again (9 left)
Please wait a second and press a button again (8 left)
Press a button.
7. We get the message:
This is a signal-repeating remote with no special repeat code.
Holding down the button can quickly yield many copies of that button's code.
Therefore, 64 samples of each button will be taken.
You will be prompted to enter each button's name in turn.
To finish recording buttons, enter a blank button name.
8. Now we teach the program ALL buttons on the remote control. The order is: you are asked
Button 1 name?
(first button name)? We write the name. In Latin letters or numbers, without spaces, it is better to capitalize the word that is on the remote control on the button. Well, like "1", "2", "PLAY", "FFWD", "STOP", "VOL +". After that, press the button for a few seconds. The numbers will run in the window, something like this:
Baseline initialized.
matches = 64, faults = 19
Press until matches reach 64. The less faults there are, the better.
9. The words "Stop" and "Button 2 name (blank to stop)" appear. We write the name of the second button. Repeat step 8 until all the buttons run out.
10. At the end of all buttons, press "Enter" without entering a name. The message "Configuration written successes, do not forget to analyze" is displayed. What we do.
11. We poke a mouse in "Analyze" we receive in the answer "analysis successfully"
12. Rejoice.
13. "Everything is ready" - Click OK, then "Hide window".
After that, boldly launch your favorite Light Alloy, go to settings, turn on WinLIRC support, configure buttons and throw yourself on a sofa with a remote control in your hands.
Server of the original LIRC program for Linux: //www.lirc.org/.
It contains many configuration files for remotes, circuit descriptions and other documentation.