When performing various carpentry work in the home workshop, sometimes you need to drill holes in the workpieces to a certain depth. For this, special stops are usually used, which are put on the drill. In the store you can buy a variety of types of such devices, including metal clamps.

However, it is not at all necessary to buy factory “nozzles” - you can make this simple adaptation yourself, using improvised materials for this. A homemade depth gauge for a drill will help you drill a hole in wood or metal workpieces of a given depth and eliminate through-hole drilling.
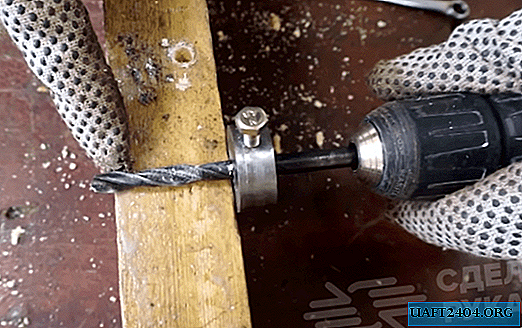
Such a homemade device is also an excellent solution for creating a large number of identical holes in the workpieces. You can make a limiter from a piece of metal with a thickness of 4-5 mm. Alternatively, you can also use a regular nut of suitable diameter.

The main stages of work
Using a metal crown, we drill a round billet of the required size. After that, we process the "five-copeck coin" on an emery or belt grinding machine. In principle, you can walk with an ordinary file, but it will take more time.

Next, we drill the central hole of the round billet under the diameter of the drill, on which the limiter will be installed. On the side you will need to drill another hole - under the fixing bolt. It is necessary to cut the thread.

Then we put a homemade depth gauge on the drill, install it in the desired place, fix it with a bolt, and you can start drilling holes. For convenience, instead of the usual bolt, you can use a wing.
The process of manufacturing a simple home-made depth gauge for a drill, see the video on the site.