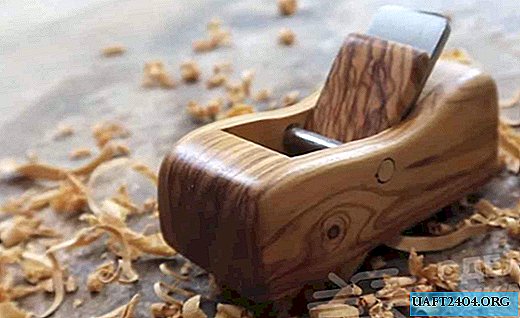
A planer is a very useful thing in the household. Especially if it has a compact size and is able to easily creep into hard-to-reach places. But in the market there are very few planers of a suitable form. You can make such a product yourself, using some tools and skills.

To make a homemade planer, first of all, you need a wooden cube of certain sizes. It must be durable, so use strong wood.
In this case, the wizard uses a regular cube from the old pallet - a very budget option. And from it you will need to make a base (handle and internal elements of the planer). A total of 5 parts should be obtained.

The main stages of work
After that, all the parts are ground and glued together. For more reliable bonding, you should clamp the finished element in a vice and wait until the glue has grasped thoroughly. After all operations, install the blade.

And for this it is necessary to cut a metal piece of the required length and sharpen it at one end. Also, to fix the blade, you will need a metal "partition" - it, together with a wooden wedge, will fix the blade in place.

For her, two holes are made in the planer body where the manufactured "partition" is placed. The final stage of work is coating the finished product with varnish. This is a rather interesting experience, and also a very practical thing in the household.

Since large and bulky planers are not suitable for some products and their processing. In such situations, a mini planer will be very helpful! You can see the detailed manufacturing process in the video.