Share
Pin
Tweet
Send
Share
Send
Materials and tools:
- screwdriver;
- a vacuum cleaner;
- a compressor or can of compressed air (optional);
- wet wipes or cloth;
- electrical contact cleaner;
- gear lubricant.
Dismantling, cleaning and lubricating the drill

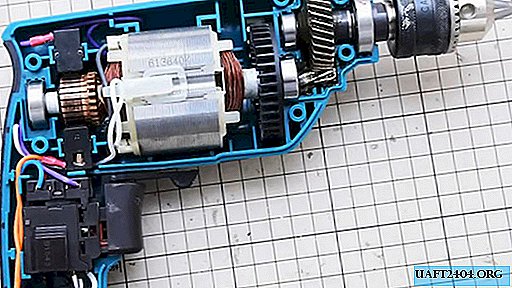
Before disassembling, wipe the drill from above. A screwdriver unscrews the screws securing her body, and he disassembles it. After this, it is better to take a few photos of the insides of the drill, so that you do not get confused during assembly.


Inside, the clamp of the electric cord is removed, brushes are removed from the landing sockets.


The gearbox with drill chuck and motor are removed.

An anchor needs to be pulled out of the motor stator.

Now you can carefully remove all the insides.

Check bearings on both sides of the armature for defects. To do this, just scroll it with your finger - there should not be any extra noise. Shake your finger from side to side - there should be no rolling. Otherwise, the bearing must be replaced.

Pay attention to how much building dust has accumulated on the stator.

The stator and rotor of the motor, the housing itself must be cleaned of dust. It is impossible to make it qualitatively with a cloth, so it is best to blow them with compressed air from a spray can or compressor.


Ideally, a vacuum cleaner whose hose can be held with a second hand should draw in dust that collects dust. Blow all wiring, button, brushes and other parts.
The plastic case of the drill is also blown, vacuum cleaned and wiped with a damp cloth or cloth.


The anchor returns back to the stator, after which the assembled motor is put in place. You should also put the brushes, making sure before that they have not jammed and have not yet been erased.


A button and a cartridge with a gear mechanism are put in place.


On the part of the anchor where the brushes rub against it, you need to apply a cleaner of mechanical contacts. He will dissolve the oxide layer. The tool is used according to the instructions. In some cases it is sufficient to spray it; in others, the manufacturer recommends that the dissolved dirt be erased additionally after a couple of minutes.

Grease generously lubricates the large gear driven by the armature shaft.

After that, the halves of the case are docked and fixed with screws.

As you can see, there is nothing complicated in maintaining a drill. If there is a fear not to assemble it after disassembly, then you can just take pictures of everything, and then put the parts in place in the picture. With normal bearings and brushes, when you don’t have to change anything, cleaning and lubrication can be done in literally 40 minutes.

Share
Pin
Tweet
Send
Share
Send