Share
Pin
Tweet
Send
Share
Send
Hello! My name is Max. Today I want to tell you how to build an enclosure for an acoustic speaker from an old tire.
The materials and tools that I used
- Acoustic power amplifier. I had a Chinese embedded model with subwoofer volume control labeled SV400;
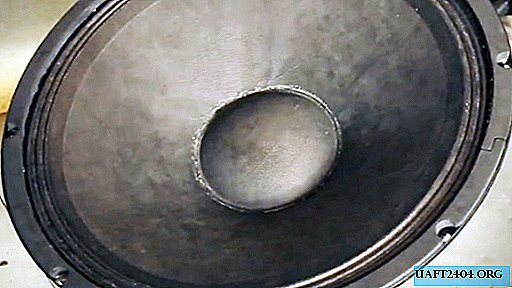
- Powerful dynamic head. At my disposal was a 15-inch speaker with a resistance of 4 ohms. I must warn that the resistance and power of the speaker should be consistent with the parameters of the amplifier;
- Old car tire. I must say right away - it should not have through holes and gusts;
- A pair of sheets of plywood. By area, it should be enough for two circles with a diameter slightly larger than the fit size of the tire. I used a cabinet door thrown into the trash;
- Powerful screws - small length self-tapping screws (15 - 20 mm). I applied screws with a 10 mm turnkey head, which, in my opinion, should emphasize the brutality of the entire structure;
- Two pieces of steel bar or reinforcement approximately 0.5 meters long with a diameter of 8 - 12 mm (options to your liking are possible) and a door hinge.


Of the tools I needed a drill, a screwdriver (or two in one), an electric jigsaw. Well, for the manufacture of the stand had to use a welding machine.
Making a car tire column

Thoroughly wash the tire from dirt using a brush and detergent.

Now, from thick plywood (in my case, from the cabinet door), we make the back wall of the column and the flange for fastening the dynamic head.

We mark on the plywood a circle whose diameter is 10 - 15 mm greater than the inner (landing) diameter of the tire. To determine this size accurately, you need to measure the height of the side rim of a particular tire.

For marking, carefully cut out a circle with a jigsaw, which will serve as the back cover.


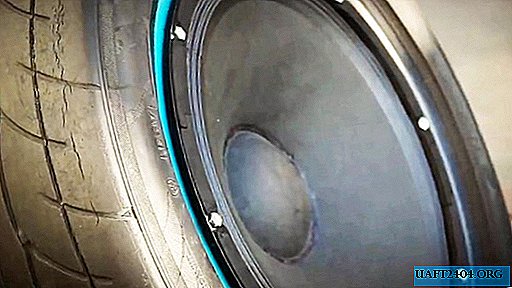
To make the flange on the second piece of plywood, we mark two circles, the outer one of the same diameter as the back cover, the inner one according to the fit size of the tire. We make a cut along the lines of both circles. We should get a ring with a width equal to the difference of the radii of two circles.

We try on the resulting parts to make sure their manufacture is correct.


In the back wall, you need to cut a hole for the amplifier.


We mark it in such a way that when installing the inside of the amplifier it appears inside the case, and the outer panel lies on the wall and can be fixed with screws. To do this, you can outline the contours of the outer panel of the amplifier, and then indent inward to provide a place for mounting.
Cutting the hole with a jigsaw, try on an amplifier. If everything is normal, you can mount the rear panel of the column to the bus. Since the structure of the tire material is quite dense, I decided to fasten the panel with screws directly to the tire, marking and drilling eight holes that are evenly spaced around the circumference.


Here I used the usual screws for a screwdriver. In order to make their conical heads flush with the surface of the rear panel after twisting, I drilled the beginning of the holes with a larger diameter drill. Having fixed the panel, I was convinced that the decision to limit myself to simple screws was the right one.
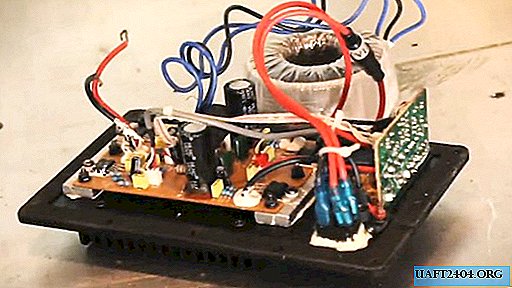
Now you can begin to install the amplifier and its supply transformer. The transformer of my amplifier has a toroidal shape, so I will fix it with a bolt with a clamping washer and a nut. The bolt hole must be drilled in the back of the column. The bolt will pass inside the annular core of the transformer, and the installed washer and nut will press the transformer against the inner surface of the panel. Looking a little ahead, it should be foreseen that a fairly voluminous transformer located inside the column can interfere with the subsequent installation of the speaker, resting on its magnetic system. To avoid this, we place the transformer closer to the periphery of the circumference of the rear panel.

After completing the installation of the rear panel, amplifier and transformer, I missed the joint between the panel and the tire with sealant. This is necessary so that during operation of the speaker, air is not pushed out by its diffuser, reducing sound pressure. For the same reason, the tire must be intact.
Proceed to install the speaker. We place the cut flange on board the tire and install a speaker on it. In the places of the existing slots for attaching the speaker, we drill holes for screwing in the screws. Before installing the speaker, do not forget to connect its two wires to the amplifier output.


On the front side, I decided to use screws with 10 mm turnkey heads. Firstly, they are more powerful and designed for a larger tightening torque, which will allow more reliable fastening of the speaker. Secondly, the external appearance of the bolt heads will give a peculiar surroundings to our product.

The final touch is the stand. In my opinion, the tire - the column should stand on the floor at a certain angle, leaning on a stand attached to the rear panel.


I welded a support in the form of a triangle from an 8 mm round steel round. I chose the length of the side of the triangle equal to the radius of the column (that is, the tire). The base of the triangle will rest against the floor, and I welded one half of the door hinge to its top. The second half of the loop will be screwed to the rear panel. Thus, the stand will have a degree of freedom, allowing you to change the angle of the column.

For greater stability and to avoid damage to the floor, I put on a rubber hose cut along the base of the stand. I painted the stand with spray paint. I think this column can also be used in a car by installing it in place of a spare wheel.

Advice
- Regarding tire size. It must be selected in accordance with the size of your speaker. For my 15-inch speaker, a 16-inch tire fit well.
- When tightening screws with a power tool, use a torque limiter to prevent the screws from rolling in wood and rubber and loosening the fasteners.
- Well and the last - observe safety measures and just be careful.
Good luck
Share
Pin
Tweet
Send
Share
Send