Share
Pin
Tweet
Send
Share
Send
It is completely easy and in a short time you can make homemade metal vice with an eccentric clamp, which are compact in size, and also allow you to quickly and reliably fix the workpiece. The speed of the vise will be especially useful when performing large volumes of work that are monotonous and monotonous.
You can make the simplest metal vise with an eccentric clamp with your own hands from inexpensive improvised materials - scrap metal residues, which are almost always found in a home workshop or garage. Therefore, we will not dwell on the materials. If there is a need to specify their features, we will clarify this in the process of work.
We will need the most common tools for work:
- welding machine;
- grinder with a cutting disc;
- drilling machine or drill;
- thread cutting tap:
- hammer;
- ticks;
- bench vise, etc.
Getting to the vise
In order for the work to argue, it doesn’t bother to imagine the final result of the work that we are just starting with: ready-made quick-clamping eccentric vises, pleasing us with their compactness, color variety and amazing capabilities to quickly and reliably clamp any workpieces.

Well, now - to work, so that the dream becomes a reality. We find the remainder of an unusable channel, mark it with a ruler and marker and cut off the necessary piece with a grinder. It will become the basis for the movable and motionless sponge of our vice.


After marking a suitable equal-angled corner, after marking, cut two pieces of equal length, which in a vice will become the base of the lips of our homemade vice.

In the middle of the shelf of one of the corners - the future movable jaw of the vice, we outline the center of the hole that we drill on a drilling machine.

On the crosspiece of the channel blank along its central axis closer to one end, we outline the boundaries of the slot along which the moving jaw of our vice will move. Mark the points by drilling and drill holes, which will be the ends of the slot.


Using a grinder, cut a strip of metal in the channel jumper between these two holes and knock it out with a tapered hammer. This slot will set the limits of movement of the movable jaw of the vice.


We cut off two pieces with a grinder from a suitable metal strip, the length of which is equal to the width of the corner shelf. They will serve as limiters for the movable sponge as it moves along the slot.


Next, we connect the corner and the channel with a bolt and nut to the position that they will occupy in the finished vice.


We clamp this design in a bench vise and weld the limiters transversely on both sides of the channel channel, holding them with pincers. In order not to accidentally weld them to the shelves of the channel, we place a thin piece of rubber, plastic or other dielectric material between them for the duration of welding.


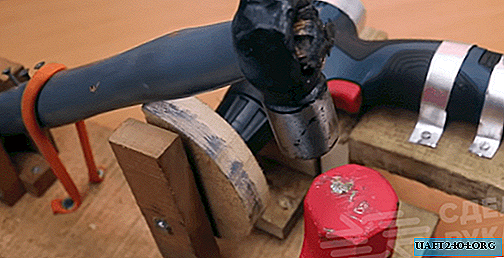
Then, from a hammer with a round head that has served, we cut off a cylindrical blank with a grinder approximately equal in diameter to a height - a blank of the future eccentric clamp.

We mark at its end a point with some eccentricity - indentation from the central longitudinal axis of the cylinder. Drill a hole through the mark parallel to the axis of our workpiece.

After marking, we cut two pieces of thick metal strip along the length and height equal to the shelf of an equal-shelf corner. This is the future lining on the jaws of a quick-vice vise.


We drill in these overlays two holes in the center closer to the edges. We deploy them on the front side under the heads of the fixing screws. With the help of a grinder, we apply a notch and we clean them. We try the quality of fixing the plates to the shelves of the corners (jaws) with two bolts and nuts.


One corner (fixed jaw) is welded transversely to the channel jumper from the side opposite the slot. We re-install the pads on the fixed and movable jaws and finally screw them in place using the key and a screwdriver.


From a rather thick metal, we cut a strip equal in size to the length of the corner, and in width to the diagonal distance between the ends of the shelves. We also weld it to ensure the strength and rigidity of the fixed sponge.


Now we take a thicker strip of metal and drill a hole from one end and cut the thread in it with a tap. Then cut off a piece of it with a rectangular threaded hole slightly different from the square.
This home-made rectangular nut will hold the eccentric on the movable sponge, and allow them to move along the channel of the channel (guide) in one direction or another.


So that the nut does not rotate under the channel jumper, on both sides of it we cut off longitudinally along the entire slot with a small gap and weld two guides of the limiter rod.


In the eccentric on the side, approximately in the middle of its height, we drill a blind hole and cut a thread in it under the handle mount.
We assemble a movable jaw of a vice with pre-welded stops, screwing the finished plate with notches to the corner with two bolts.

We find a piece of sheet iron of sufficient thickness to provide rigidity. We outline on it the contours of the base of an octagonal shape with two marks for the holes for fastening. Using a grinder, cut it out.
We weld to it a channel (guide) with a fixed sponge. We process welds and surfaces with a grinder to remove rust, metal influx, roughness and rounding of faces.


We glue the sponge pad and the longitudinal slot with a margin on the sides with construction tape.

Using a spray can, paint the base, the guide and the fixed sponge in black, the movable sponge (except for the cover) with green paint, and the eccentric bronze.


After drying the paint and removing the adhesive tape, all parts of our eccentric vise are basically ready and just waiting for the final assembly.


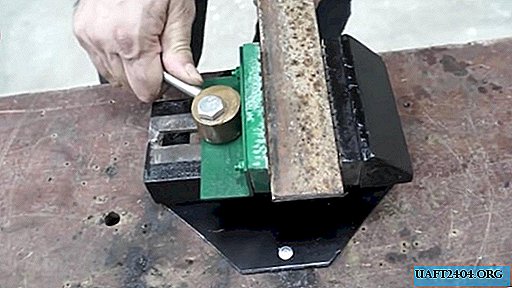
To do this, it is enough to install the eccentric and the movable sponge on the guide, pass a bolt through the holes and install a rectangular nut from below the guide and screw the bolt into it.


We screw the handle into the side cam, and fasten the base of the vise with two screws to a solid wooden base. Our own quick-release eccentric vise is fully operational.


With their help, with one movement of the eccentric handle, you can fix any workpiece in them quickly, reliably and without unnecessary effort.

Remarks at the end
Since you have to work with a grinder, a welding machine, a drilling machine, it is necessary to use personal protective equipment, at least glasses for eye protection and gloves on your hands.
In order for the moving parts of the eccentric vice to work without jamming, they can be lubricated with graphite grease from time to time, and the eccentric lever can be equipped with a wooden handle for convenience.
Share
Pin
Tweet
Send
Share
Send