Share
Pin
Tweet
Send
Share
Send
In late autumn and winter, ice is a common thing. Not everywhere, pedestrian paths are sprinkled with sand, because at this time, traumatologists rarely sit without work. Slipping on ice and breaking your arm or leg is a simple matter. A split second, and you're done. Lying down with a broken leg for three weeks, and then rubbing armpits with crutches for another month is not a bright prospect at all. Therefore, the people show all the wonders of their ingenuity, so as not to be in a hospital bed! Who buys winter shoes with spikes already mounted in the sole, who glues special non-slip pads on the soles, and who even tries not to leave the house without emergency. I, however, can’t sit quietly on weekends and holidays at home - I’ll definitely walk 7-8 km. through the forest, specially trodden by athletes, runners, and walkers like me, a trail. This route abounds in fairly steep descents and ascents.

It is clear that no one in the forest will sprinkle sand on the road. Because I, for several winters in a row, equip my shoes with homemade spikes. This case is short-lived; on the manufacture of the spikes themselves, as well as on their installation, it takes me about an hour. But then you can not worry about your hands and feet for the rest of the winter and the coming spring, until the snow comes down. But, as in any business, here, in addition to numerous advantages, there are also disadvantages; such a studding will hold well and work effectively only on the sole of dense, elastic rubber. Spikes will not hold on the soles of soft and elastic rubber, just as you don’t hold them there ... a couple of walks - and there will be no trace of the spike. And literally! But soles made of such soft rubber are usually made for summer shoes, for running sneakers, or for playing basketball in the gym, so there are few chances to make mistakes. And yet, it’s better to make sure.
Will need
- Sheet metal (1 mm thick)
- Screws (black is better, on wood - they are more tenacious, 15 mm long.)
- Scissors for metal.
- Ruler.
- Marker.
- Punch.
- Hammer.
- Pliers.
- Phillips screwdriver.
- Drill.
- 4 mm drill
- Seconds glue.
Spike shoes
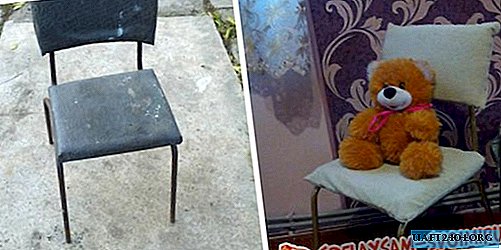
First you need to clean the shoes and its sole from sand and dust, and while we are making studs, you can put it on a warm heating radiator. We will make spikes from galvanized sheet metal, one millimeter thick.

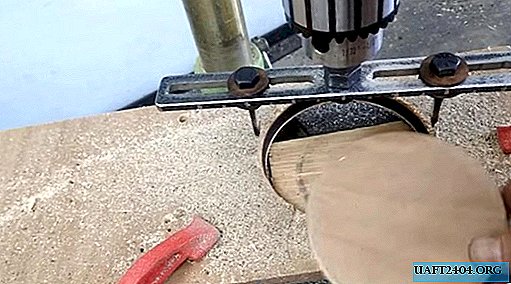
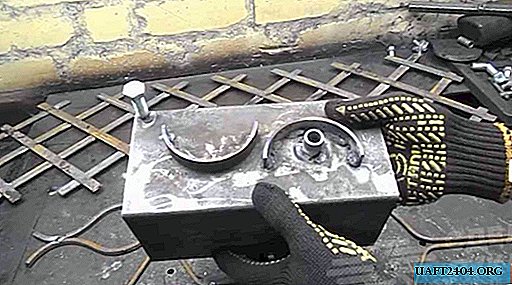
So, with the help of a ruler and marker, we mark the metal in the form of a regular cell. The area of each square should be 15 × 15 millimeters.

Next, we take a punch and a hammer, and in the center of each square we make a mark for the drill. We drill with a drill and a drill for four millimeters holes in each square, on a punched site.


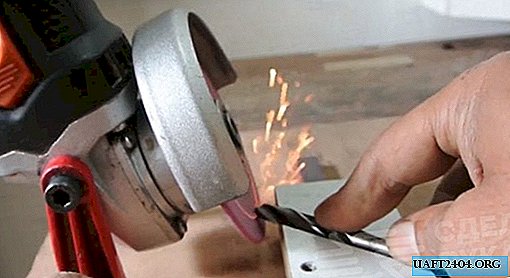
We cut out the drilled squares with scissors for metal.

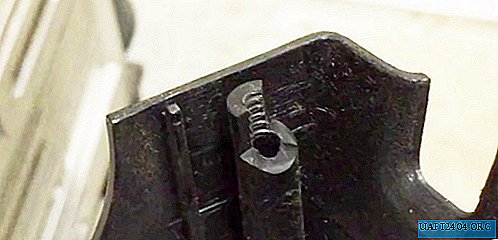
Here I would advise you to better cut them with a small grinder, with a thin cutting wheel, if such tools are available, because the metal is thick for scissors, and I squeezed all my fingers and palms! After cutting, we take pliers and bend the corners of each square in one of the sides. How long to bend corners depends on you - how long would you like spikes. The main thing is that between the bent corners the head of the screw fits.


Now we remove the warm shoes from the heating radiator and fasten the finished spikes to the pre-selected treads. There is one subtlety - twisting the screw three quarters, I still drip a second glue on the thread, and only then drive the screw into the tread completely.


Just in case. It certainly won’t be worse.


With spikes finished. Now let's take a moisture repellent.
Will need
- Birch tar.
- Solvent.
- Some cologne (a few drops, as a perfume).
- Cotton pads or napkins.
- Latex gloves.
- 250 ml bottle.
Shoe impregnation
Birch tar can be purchased at any pharmacy, but I caught it in advance, back in the summer, in sufficient quantities for such needs. How to drive the tar out of birch bark, I already once told in a master class on manufacturing mosquito repellents. However, this is not the season; to get tar from the birch bark in winter is a headache ... So, we dilute the birch tar in a bottle with a solvent, in a one to one ratio. Shake well. In the finished mixture, we inject with a syringe about one cube of any cologne you have chosen. Shake again. We put on rubber gloves in our hands so as not to get dirty, we wet the napkin with the prepared solution and apply it to the shoes.

Do not regret the solution! Thanks to the solvent, it will penetrate into all pores of the shoe. Very soon, the solvent will evaporate, and the tar will remain inside, and will protect the material from which the shoes are made from moisture. Also, do not forget about the seams that fasten the walls of the shoe with the sole. Sutures must be soaked 2-3 times, with a break of 30-40 minutes, as this is the most vulnerable spot of shoes. Moreover, the impregnation here has a double benefit; in addition to water-repellent properties, it will slow down the decay and decay of the seam thread and, as a result, the wear of the thread and the further decay of shoes and soles. We put shoes on a warm radiator. The next morning, you can safely put on shoes for a walk or work, and any weather will be nothing.

The main thing is to keep your feet dry, warm and comfortable, then illness will bypass you. The shoes are confidently kept on ice, on trampled snow, and also do not slip on a smooth tile, due to the fact that the spikes are located on the sides of the sole - the rubber of the center of the sole calmly reaches the smooth tile and prevents slipping.
Share
Pin
Tweet
Send
Share
Send