Share
Pin
Tweet
Send
Share
Send
You probably already watched a contagious video that showed floors, bar counters, and coin countertops.
As you can see, the idea caused a stir and everyone wanted to have their own floor made of coins.
We decided to share a master class in which we will tell you how to do it.
Materials


What you need:
- Transparent epoxy.
- Glue.
- Black grout for joints.
- Scraper with rubber nozzle.
- 2 buckets.
- Resin spreading paddle.
- Protective gloves, glasses, clothing.
- Coins - count how many you need and decide which ones you need - old, sparkling or shuffled.
For this master class, we decorated the imitation of the floor - in your case, make sure that the floor is absolutely even and clean. And you can start!
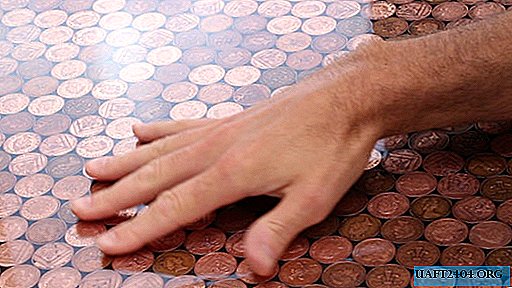
Coins, coins and many more coins


First apply a line of glue, then start laying coins on it side by side.
Take a comfortable pose in which you can work for a long time.
Keep stacking coins until you cover the entire surface. Now let the glue dry well (ideally all night).
Grouting


Now, using a rubber scraper, cover the coins with black grout.
The mixture should be in the spaces between the coins (to the baseboard).
Let her harden a little.
Remove excess grout with a cloth. Please note that grouting can to some extent serve as an abrasive. Therefore, if you want to emphasize the antiquity of coins, then do not rub too much.
Then we leave the floor until the grout completely hardens and after that we remove excess material with a vacuum cleaner.
Calculation of the amount of epoxy resin and its preparation


To find out how much resin you need, you first need to accurately calculate the floor area.
For coins covered floors, the minimum recommended epoxy thickness should be 2 mm.
You need to have 2 buckets for mixing. Wear protective clothing, gloves, and goggles to work with the resin.
Separately calculate the required amount of pure epoxy.
And separately calculate the amount of hardener for it.
Thoroughly mix the epoxy in the first bucket.
Pour the mixture into a second bucket and mix again.
It is recommended to mix no more than 5 kg of resin at a time. And if you need more, then repeat the process. This will allow you to accurately calculate the quantity, and thoroughly mix and disperse the resin before it begins to solidify noticeably.
Pouring and dispersion of epoxy


Now you can start pouring the floor with epoxy. We start from a far corner and help her spread out with a spatula.
Most epoxies do not form gas bubbles. But if they appear, you can remove from using a hair dryer.
If there is not enough resin on the surface, then you can repeat the process and pour the required additional amount on top of the treated surface. After the floor surface is completely covered, leave it to harden (according to the manufacturer's instructions).
Final stage


When the floor is completely hard, you will see a beautiful surface that looks like glass.
The time spent on work depends on the area of the surface to be coated, plus the additional time for drying and solidification.
Ideas
You can apply a similar technique to the top of a countertop or bar, furniture, trays, coasters for hot dishes. Resin can be corked bottles, glass fragments, stones, wood and many other things. Small scratches are easily removed with abrasive paper and polishing mixtures. However, the surface should not be exposed to an open source of fire or heavy loads.
Original article in English
Share
Pin
Tweet
Send
Share
Send