Share
Pin
Tweet
Send
Share
Send
This is a Tien cutter (named after the inventor, Phil Thien), whipped up from a 20-liter bucket.
The advantage of the Tien cutter is that, unlike the traditional cyclone separator, it does not require a significant structural height, and it will occupy very little vertical space. The air in it moves on a flat surface from the edge to the center. It works with the same efficiency as the cyclone separator (if not better), does not take up space, and you can assemble it literally from cheap materials at hand in 45-90 minutes.
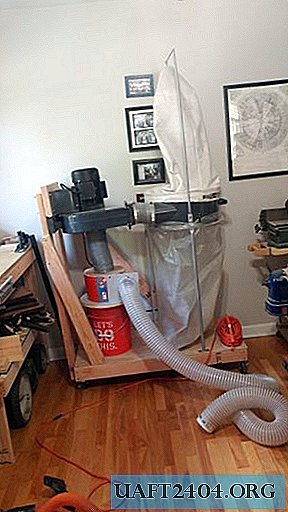
Dust collection system.

Dust collection system before connecting the cutter
Bucket.


Cut out a portion of the 20 liter bucket.
Circles.


Use the portion of the bucket to draw circles on a piece of wood. You will need three of these circles. One circle is inserted inside the top of the bucket, another circle will go inside the bottom, and another will be outside the bottom.
Cut out.


Use a milling cutter and a milling compass to cut circles. A jigsaw is also suitable for this.
Circles.

The circle on the left will be installed outside the bottom of the cut bucket. A groove is cut into it with a milling cutter so that it can be put on the top of another whole 20-liter bucket. The circle on the right will be set inside the top of the bucket.
Outside down.


Attach the outer bottom with screws and silicone.
Trumpet.


Cut a portion of the PVC pipe and round it so that it fits snugly against the side of the cut bucket.
The hole in the bucket.


Cut a hole in the bucket so that it matches the diameter of the piece of PVC pipe.
Support.


Cut a piece of wood to support the pipe. Attach the pipe to a piece of wood and the tree to a carved bucket.
File with a file.


File the hole in the side of the bucket so that the pipe enters easily and unhindered. Use silicone to seal the hole.
Inside, top view.


Cut a hole in the top of the circle for the upper inner part. Cut a piece of wood that will stand above the hole and hold the dust bag and glue in place.
PVC


At the bottom of the upper inner circle, use silicone to cover the PVC pipe that will go into the cut bucket.
We close.


Screw the upper inner circle to the top of the bucket on the screws, and then coat it with silicone.
Inside the bottom.


Divide the inner lower circle into three parts. Saw off three centimeters from the outside of the two resulting thirds. Screw the circle onto the screws inside the bottom of the bucket.
Base.


Make a wooden base on wheels to make it easier to work with the collection system.
Bag.

Attach a bag and filter to the base.
Support.

Make a support to hold the motor.
Exhaust motor.


Attach the motor to the support, bag and filter.
Bucket for dust.

Stick window seal around the top edge of the dust bucket. Use glue or epoxy for this.
Cutter.

Attach the cutter to the pipe motor.
We collect dust.

Lift the cutter and place a dust bucket under it. The weight of the cutter and the pressure of the compressed air from the pipe seals the bucket by themselves.
That, in fact, is all. Your cutter is ready to go. The incredible simplicity and reliability of the design, which you yourself can see by looking at the assembly process, make it an excellent alternative to an ordinary cyclone separator.
Original article in English
Share
Pin
Tweet
Send
Share
Send