Share
Pin
Tweet
Send
Share
Send
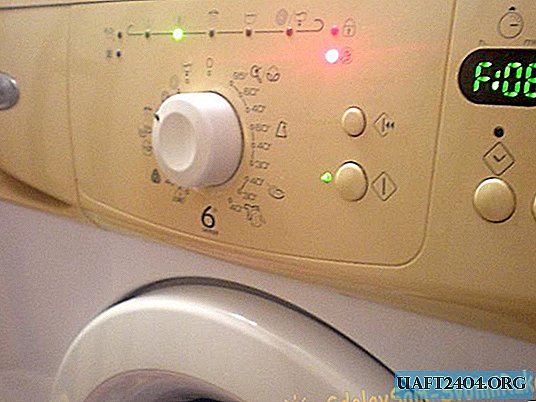
Signs of damage.
Many manufacturers, in the intellectual part of the washing machine, have the same error codes. If you find out on the displays, at startup, the inscription F 08 (for electronic devices), or the indicators “Speed”, “Quick wash” (for electromechanical devices) are constantly on, it means that the equipment is faulty and its further operation is impossible.
The algorithm of mechanical and electromechanical devices.
Machines equipped with an electronic control board will give an error at the beginning of the wash, after the pump is running. Since at this time, the electronic module does a check of the main electrical components: a tubular electric heater (TEN), a water level pressure switch, an electric water valve, etc. In mechanical units (machines manufactured before 2000), this breakdown manifests itself in the form of a cold water during washing.
The causes of the malfunction.
Error F 08 occurs due to damage:
- electric heater (in 80% of cases);
- water temperature sensor (in 8% of cases);
- control relay of the heater (in 12% of cases).
TEN and the temperature sensor break if:
1. They are made of substandard materials.
2. It has local overheating due to the formation of a non-metallic layer on the working surface (scale, foreign objects).
3. A voltage of more than 240 volts is applied.
The control relay may be damaged if the device is connected to an unstable network (when the voltage is constantly changing from 160 to 260 volts). In this case, there is a violation of the electrical connection between the mains supply and the heater, due to carbonization of the power closing contacts, and since the relay is enclosed in an opaque case, it will not be possible to visually detect a breakdown.
Troubleshooting the node.
To determine the damage to electronic components, you will need: a measuring device with an ohmmeter function and testing of semiconductor devices.
Step number 1.
Since, in most cases, the heater breaks down in the typewriter, it means that it must be examined first. The heater is located at the bottom of the tank, from the front or back of the machine. After it is detected, disconnect the neutral and phase wires from the contact group. Connect a multimeter to them in the "Ohmmeter" mode. If the readings are:
- 0 - there is a short circuit in the heater circuit, between the casing and the heating wire;
- 1 - an open circuit is present in the heater circuit;
- 25 - 30 Ohm - The heater is in good condition.
To study the relationship between the contacts of the heater and its metal tubular shell, the tester switches to diode test mode. One probe is alternately connected to the electrical terminals of the heater, the other to its body. When the metal shell and the spiral are closed, the tester will start to make sounds (beep) and show a resistance of 0 ohms.
If a failure is detected in the heater, it must be replaced with a working one. To remove the heater from the washing machine: unscrew the nut of the bolt of the clamping plate so that the nut covers the beginning of the thread of the bolt. It is located near the temperature sensor. Hit the nut with a hammer before moving it to the heater retainer plate. Grasping his contact with pliers, applying vertical and horizontal forces, pull out the worn part. Clean the heater seat on the outside, inside the drum of dirt and scale. Disassemble and install the temperature sensor from the removed electric heater to the mounted one. On it, as far as possible, move the pressure bar away from the stop bar. In this case, the nut should be on the end of the bolt. Getting into the clamps for the heater, which are located inside the sealed drum (such heater fasteners are used only in old-style machines), install the heater until the stop plate touches the housing. Tighten the nut until the heater is securely in place. Connect the electrical wires to the mounted assembly. Assemble and verify the operation of the equipment.
Step number 2.
A water temperature sensor is integrated in the stop bar and rubber seal. Under the influence of temperature, it changes its resistance. To check it:
1. From a contact group disconnect a socket.
2. Tester determine the resistance of the part.
The readings of a working sensor with an increase in the ambient temperature will change downward. At a temperature of 20 degrees Celsius, depending on the model of the sensor, the resistance is in the range of 5 - 6 kOhm, at 50 C0 - 1300 - 1400 Ohm.
If the measuring device displays 0 or 1, then the sensor must be replaced with a working one. For this:
- unscrew the nut of the clamping bolt, before it starts;
- strike the nut before moving it to the connecting strip;
- pull out the damaged sensor;
- in the vacant seat, install a working sensor;
- tighten the nut until the TEN is firmly fixed;
- connect the plug with wires.


Step number 3.
On the control board, determine the location of the relay. It is easy to find through the wires connected to the heater. The relay consists of a control (electromagnet) and a power part (powerful moving contacts). To detect a breakdown, it is necessary to check the resistance of the inductor, which is in the range 175 - 190 Ohms and the condition of the contacts. The relay must be replaced if:
1. The electromagnet is shorted or open.
2. The contacts do not conduct electric current during short circuiting (oxidation, carbonization of work surfaces).
3. The contacts are always in the closed position (sticking).
If one of the above types of breakdowns is detected, the relay must be replaced.
Relay replacement sequence:
- using a soldering iron or electric soldering iron, disconnect it from the circuit board;
- free the landing holes from the tin;
- on the board, install a new relay;
- Using flux and tin, solder the contacts to the tracks securely.
Share
Pin
Tweet
Send
Share
Send