Share
Pin
Tweet
Send
Share
Send
I want to tell you how to make a Christmas tree made of threads with your own hands, which can be made with children. Production takes a small amount of time, but the result is pleasing to the eye. This craft can be attributed to school or kindergarten, as well as put in the kitchen or in the room to feel the approach of the New Year.
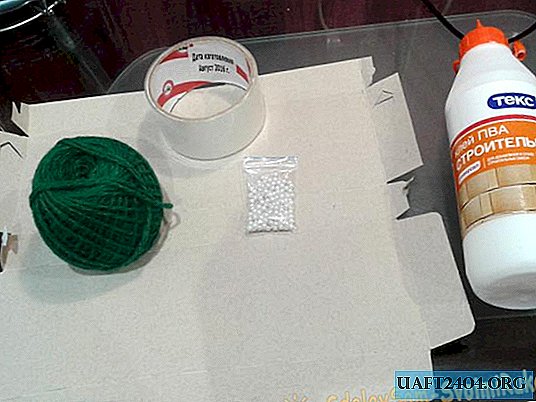
For the manufacture we need:
1. Cardboard sheet
2. A skein of green thread
3. PVA glue
4. Beads
5. Adhesive tape
6. Scissors
A sheet of cardboard can be taken in any size. It may even be a Whatman paper. Then the tree will turn out high. I didn’t have cardboard, so I took the usual cookie packaging. You can also use a regular cardboard cover from a notebook, as an option.
The cardboard must be glued with tape so that the finished Christmas tree can be easily peeled off. It is better to glue the sheet in expanded form, it’s easier.
A sheet of cardboard is glued with tape.


Turn it into a bag to make a cone.


The cone turned out with an uneven bottom, so we fold it and cut off the excess.


The bottom will need to be cut with scissors, so to speak, to make denticles for which the thread will cling.


We dilute PVA glue with water in a small bowl. So, it will be liquid, which allows you to work better with it.

Take a skein of thread. They are green, because they must match the color of the tree. The needlework store has a huge selection of threads, differing in thickness and composition.

At the end of the thread we tie a knot so that it is possible to catch on the bottom of the tree.

The moment begins when the hands will be stained in glue and this is not the most pleasant in the manufacturing process.
We lower the thread in a bowl with glue, it should be soaked well.

Also, you can lubricate the cone with glue, it will not be superfluous.

We fasten the knot to the bottom and begin to create.

We wind the cone in a random direction: in a circle, up and down. Do not forget to thread the thread all the time in the glue.


Our cone is wrapped, there are few gaps left, so the matter temporarily ceases. Cut the thread and leave the glue to dry for several hours.

When the glue has dried, you need to cut off the bottom of the tree, where we fastened the threads.

Now carefully peel the cardboard from the threads. This is done easily. If the threads were well impregnated with glue, then they will not deform, and will keep their shape firmly.

Here is such a simple Christmas tree is ready. Let's start decorating.

Take the small beads. We will fix them on the tree with glue-moment. You can use any other glue that has good bonding ability. PVA in this case disappears.
Slowly, one by one bead, glue them to the Christmas tree in a circle. So, our beauty dresses up, and become a real Christmas tree with New Year's toys-balls.


Christmas tree is ready. Happy New Year!
Share
Pin
Tweet
Send
Share
Send