Share
Pin
Tweet
Send
Share
Send
After acquiring a country house, a plan for its reconstruction was drawn up, the first paragraph of which provided for the installation of a new fence. The old fence with a gate and a gate was wooden and heavily rickety - it was decided to demolish it. In order not to leave the site without fencing, the old fence was left until the end of work. The new fence was made half a meter in front of the old one - there was enough space for this.
Installation of metal fence
When choosing the material for the fence, various options were considered: brick, natural stone and ready-made concrete panels (the so-called Euro-fence). The first two technologies were abandoned immediately because of their high cost and laboriousness of the installation, and about concrete panels there were doubts about their strength. As a result, the choice fell on a fence made of profiled steel sheet mounted on a supporting frame.
To reduce the cost of reconstruction, most of the work that did not require specific skills was planned to be carried out on their own. Due to the lack of a welding machine at that time, the connection of structural parts was carried out using studs with nuts and washers. This somewhat complicates and delays the process, but in the end it allowed to save an amount equal to half the cost of materials.
Design and design activities
Before starting work, the site was measured, a preliminary design was drawn up, and the need for materials was calculated. The total length of the metal profile fence was 23.6 meters, the minimum height was 1700 mm. The plans included the installation of an entrance gate with a width of 0.8 - 0.9 m and an entrance gate with a width of 3.0 m. The moving elements of the fence are swinging, opening outwards.
After the calculations, a list of materials required for the erection of the fence was drawn up, which includes the following items:
- Steel profiled sheet C-8x1150 dark red 1.7 m long - 4 pieces and 1.5 m - 16 pieces.
- White silicate brick - 500 pieces.
- Portland 500 brand cement - 5 bags of 50 kg each.
- Sand quarry washed and sifted - 5 tons.
- Crushed stone of mixed fractions - 5 tons.
- Steel profiled pipe with a section of 40x40 mm - 60 linear meters (lm), with a section of 20x20x1.2 mm - 24 lm.
- Steel angle 25x25x3.5 mm - 30 l.m.
- A sheet of steel 2 mm thick - 1 piece.
- Channel M12 - 4 pieces of 2.5 m.
- Sheds - 5 pieces.
- Fasteners: 8 mm studs, M8 nuts, washers, self-tapping screws, aluminum rivets and M8 bolts with a large head for a screwdriver.
For the installation of the fence required the following tools:
- Shovels bayonet and shovels, buckets for bulk materials and water.
- Trough for mixing concrete.
- Angle grinder with cutting and grinding wheels.
- An electric drill with a set of drill bits for metal.
- An electric screwdriver.
- A device for installing rivets.
- Hand tools: wrenches, pliers, tongs, screwdrivers and a nail puller.
- Tape measure, hydraulic level, plumb line, corner, cord and pegs.
- An extension cord 50 m long.


Materials were purchased in one company, which allowed to reduce time and get a small bonus in the form of delivery at the seller’s expense. Storage was carried out in a courtyard under a canopy to avoid getting wet in case of precipitation.
Site preparation and marking
The site in front of the old fence was cleared of vegetation and debris. At extreme points pegs were connected, interconnected by a cord. Using the hydraulic level, zero marks were made, from which the height of the erected fence was measured. In places of installation of gates and gates, additional pegs are installed. The gaps between them were divided in equal shares and also indicated for the installation of pillars.
The next paragraph of the work plan provided for the preparation of trenches for sand and gravel cushions and pits. The depth of the ditch should be at least 20 cm, and the depth of the pits for the columns should be about 80 - 90 cm. The excavated soil was evenly distributed over the area in front of the yard and leveled. The pillow was filled in two layers of equal thickness: first gravel, then sand flush with the earth's surface.
Support poles with a length of 2.5 m were installed in the two extreme pits, so that their height was not less than 1750 mm. After concreting the pits, the vertical position of the posts was checked using a plumb line. Crushed stone was introduced into the sand-cement mortar to increase strength. Previously, all columns were coated with a primer to protect against corrosion.
Cords were drawn between the installed posts at a level of 25 cm from the ground, indicating the height of the pillars and masonry. At this, the preparatory measures were completed and it became possible to proceed directly to the installation of the fence.
Installation of columns and brickwork
At this stage, an assistant was needed, whose tasks included mixing the solution and supplying materials. First of all, columns were installed and concreted. The work was simplified by stretched cords. They indicated the plane of the fence, and it was necessary to control the verticality of the installation in only one direction. In the places of installation of the gates, channels were installed and concreted.
In between the columns, brickwork was carried out at the level indicated by the lower cord. The basis for it was a sand cushion that was dumped and tamped at the previous stage. In the process of masonry, a trowel and a special mason hammer were used. The gaps for the installation of gates and gates were left empty.
Installation of the supporting frame of the fence and sheathing with corrugated board
A corner was fixed on top of the support columns using scraps of tubes with a diameter of 10 mm and a length of 15 mm, as well as M8 bolts with nuts. A profiled steel pipe was installed at a level of 50 cm from the brickwork. The installation of these elements with studs and nuts was carried out after preliminary drilling.

The corrugated board was attached to the frame installed at the previous stage using rivets and self-tapping screws. This operation was performed as follows: the sheet was turned around the corner and rose up to the stop. In this position, he was fixed with wooden wedges, which were set in opposition between the masonry and corrugated board. Holes were drilled in the right places and the sheet was riveted to the corner and profile.
Production and installation of gates and gates
This operation was carried out in two stages: the wicket and gate frames were assembled on an impromptu slipway, and then hung and trimmed with corrugated board. The supporting structures consist of two vertical and two horizontal profiles with a section of 40x40 mm, interconnected by means of overhead slopes of a triangular shape. The corners were installed at the bottom with bolts and tubes.


The gates and gates were hung on finished separate sheds, one part of which was pre-mounted to the posts. Frames were installed and fixed using wedges. The edge of the sheet was planted behind the lower corner, after which it pressed against the upper corner removed at that time and riveted to them. After that, the gates were equipped with a deadbolt, and the gate was equipped with an ordinary mortise lock.


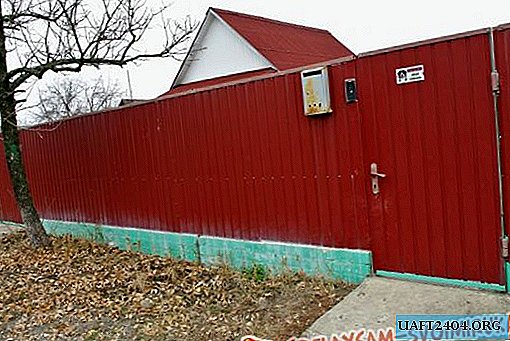
Subsequently, an intercom and a mailbox were installed at the entrance. During the work, the old fence was dismantled in parts, which allowed not to expose the yard until the installation of a new fence. As a result of almost ten-day efforts, a pleasant-looking and, most importantly, very functional protective structure was obtained. A metal fence is one of the most affordable and reliable types of fencing.
Share
Pin
Tweet
Send
Share
Send