Share
Pin
Tweet
Send
Share
Send
Manufacturing process:
1 step. Roll a piece of salt dough into a layer about 1 centimeter thick. In size, it should be slightly wider (1-1.5 cm.) Than the glass in that place, which will then be cut out the base of the New Year's candlestick.
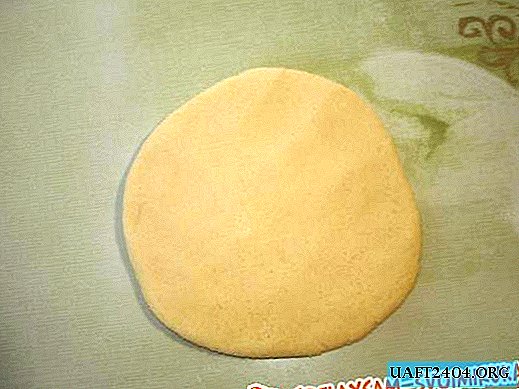
2 step. Squeeze out a circle in a rolled dough with a glass.

3 step. Separate the resulting sausage around the edges. Put a small candle in the middle of the base.

4 step. Dip the brush into the water. Moisten her all the space around the candle.

5 step. Cut a suitable length from the sausage. Place it around the candle on a wet surface. Fasten the ends together.

6 step. With wet hands, smooth out any bumps in the joint.
7 step. Roll out another sausage from the dough. In its length, it should coincide with the size of the circle at the base of the candlestick.


8 step. Moisten the side of the base.

9 step. Glue the second sausage. Smooth the place where the two ends connect to each other.
10 step. Take scissors with thin and sharp ends. For this purpose, nail scissors may be the most suitable. Carefully cut the dough needles on the top and bottom of the candlestick.

11 step. Place a candle inside the candlestick for verification. It should fit freely inside the hole.

12 step. Before further decoration, the salty dough candlestick must dry and harden. About a day this process will last in a warm room. Things will go much faster if you use the oven. In this case, the heating temperature should be no more than 60 degrees, and the door should be slightly opened.

13 step. Put the candlestick ready for painting on the work surface. Cover in one layer with green gouache. To dry.

14 step. Trick one end of the sponge into white gouache. Wait a minute (until the paint is partially absorbed into the pores), and then apply "snow" on the green painted surface.

15 step. Prepare the beads. Lubricate with PVA glue those places where they will be attached. Stick the beads.

16 step. Similarly attach other decorations.

17 step. Make four small bows from red and gold ribbons.

18 step. Coat the bow on the back with PVA glue. Attach to a candlestick.

19 step. Glue all 4 bows around the same distance. Golden alternate with reds. At this stage, it is important to remember that the candle will burn, so place the bows at a safe distance from the fire.


Leave the finished candlestick for an hour. During this time, all glued parts are well bonded to the base. Then put a candle inside the candlestick. The product is fully ready for use. You can light holiday lights.
Share
Pin
Tweet
Send
Share
Send