Share
Pin
Tweet
Send
Share
Send
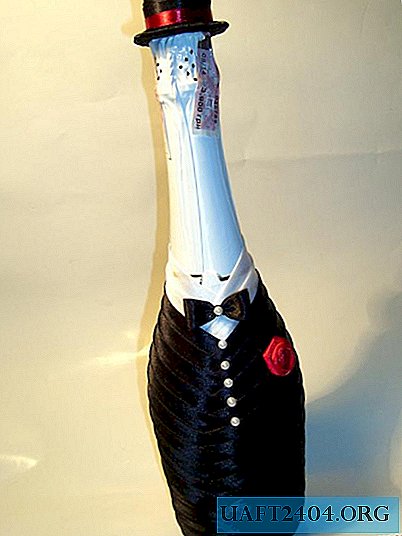
We hope this workshop will be useful for you and will inspire you to create such a cute gentleman in a hat. So, what we need in work:
- a bottle of any champagne
- slanting inlay of black color (meters 6)
- a slanting inlay of white color (20 cm will be enough)
- scissors
- glue
- narrow contrast tape (I have a dark red color)
- a ribbon of the same color
- mother-of-pearl semi-pearls
- a narrow plastic cap with a diameter equal to the diameter of the neck of the bottle
- there is still scotch tape in the photo (I planned to use it for attaching the cylinder to the fields of the hat, but it was not needed)
- cardboard

All materials are ready, so let's get started.
To begin with, we need to remove the label from the bottle. To do this, leave the bottle overnight in cold water. The next morning you will remove the label in one motion and you will have a clean bottle.
Let's dress our groom now. Let's start by imitating a shirt. We take a slanting inlay of white color, cut off a length sufficient to grip the neck of the bottle and glue it. I use glue moment.

Repeat the procedure and glue the second layer of white oblique inlay, slightly going to the first. It turned out a white shirt.

Now we do the same only with a black slanting trim, creating an imitation of a black suit.

Gradually lower down until the bottle is leveled.

When the bottle has already become smooth, there is no need to cut the oblique inlay, wrap the bottle in an oblique edging, and fix it with glue from the back.

Our fiance is dressed. Photos from the back.

Getting to the hat. Cut out a circle from cardboard. The inner diameter is equal to the diameter of the neck of the bottle minus 2 mm. I plan to increase the growth of our groom at the expense of the hat, so I will not put it on the groom, but glue it on top (so I’m making the diameter smaller so that the hat does not fail, but remains on top of the neck). If you want to literally put a hat on the neck of the bottle, then add a few millimeters to the diameter of the neck of the bottle and get the size of the inner circle. Because the cylinder has narrow fields, the outer diameter of our cardboard circle is 2 cm larger than the inner one.

Do not be alarmed if the edges are not very smooth. This will not be visible.
We wrap the fields of our cylinder with a black oblique eyelet, leaving a small segment free. Do not forget to glue everything well.

As I said, I will not put a cylinder on a bottle, because I want to make the groom taller. Therefore, I put the fields on top of the neck of the bottle, and fix it with glue. For additional fixation, I glue on top of the neck that free edge of the oblique inlay that we prudently left.

It remains the case for small. Make a cylinder. To do this, I found a plastic cap from one of the cosmetics. The diameter of the cap coincides with the diameter of the neck of the bottle. I wrap it with an oblique trim.

And glue the hats to the fields.

For hat decor, I glue a contrasting narrow ribbon at the bottom of the hat.

I create an imitation of buttons with the help of white semi-pearls. Securely fix them with glue on the suit of the groom.

Where without a boutonniere? I take a rose from the ribbons of the same color that I used to decorate the hat, and glue the groom on the chest.

Something seems to be missing ... Butterflies! I take a black slanting trim, I put it in two layers. I wrap it in the middle with black thread. Glue on the shirt of the groom.

I decorate the butterfly with a white semi-pearl.

Our fiance is ready!

Back view.

Share
Pin
Tweet
Send
Share
Send